Your First Smart Home Project: Automate 2 Functions Under $100
Embark on your smart home journey by automating two fundamental functions for under $100 this year, leveraging accessible technology to enhance daily convenience and energy efficiency.
Embarking on your first smart home project doesn’t have to be an intimidating or expensive endeavor. In fact, with the right approach and a clear understanding of your goals, you can easily automate two basic functions for under $100 this year. This guide is designed to demystify smart home technology, making it accessible for everyone, regardless of technical expertise or budget constraints.
Understanding the Basics of Smart Home Automation
Before diving into specific projects, it’s crucial to grasp the fundamental concepts behind smart home automation. This involves understanding how devices communicate, what kind of control systems are available, and the potential benefits these systems offer. Smart home technology has evolved significantly, becoming more user-friendly and affordable, which opens up a world of possibilities for even the most novice users.
At its core, smart home automation connects various devices in your home, allowing them to communicate and be controlled remotely or automatically. This connectivity is typically achieved through wireless protocols like Wi-Fi, Bluetooth, Zigbee, or Z-Wave. Each protocol has its own advantages in terms of range, power consumption, and device compatibility. For budget-friendly projects, Wi-Fi-enabled devices are often the most straightforward and cost-effective choice, as they leverage your existing home network.
Key Components of a Smart Home System
To automate functions, you’ll generally need a few key components. Understanding these will help you make informed decisions about your purchases.
- Smart Devices: These are the physical gadgets you want to control, such as smart plugs, light bulbs, or sensors.
- A Control Hub or App: This acts as the brain or interface for your smart home, allowing you to manage and schedule your devices.
- Internet Connection: Essential for remote control and many smart functionalities.
The beauty of starting small is that you don’t need an elaborate hub right away. Many entry-level smart devices can be controlled directly via their manufacturer’s app on your smartphone, connecting directly to your home Wi-Fi. This simplifies the setup process and keeps costs down, aligning perfectly with our under-$100 goal.
In conclusion, smart home automation is about convenience, efficiency, and control. By understanding these foundational elements, you’re well-prepared to select and implement your first smart home project effectively and affordably.
Choosing Your First Two Automation Functions
The key to a successful and budget-friendly first smart home project is selecting functions that offer significant impact without requiring complex installations or expensive hardware. We’re aiming for practicality and noticeable improvements in your daily routine. Think about everyday tasks that could be made easier or more efficient with a touch of automation.
Two excellent starting points that consistently deliver value for money are smart lighting and appliance control. These functions are highly versatile, relatively inexpensive to implement, and immediately demonstrate the benefits of smart home technology. They also provide a solid foundation for future expansion, should you decide to delve deeper into home automation.
Automating Your Lighting for Convenience and Security
Smart lighting is perhaps the most popular entry point into smart homes, and for good reason. It offers unparalleled convenience and can even enhance home security. Instead of fumbling for switches, imagine your lights turning on automatically when you enter a room or at sunset.
- Smart Plugs for Lamps: The simplest and most affordable option. Plug a traditional lamp into a smart plug, and instantly, that lamp becomes smart.
- Smart Light Bulbs: These replace your existing bulbs and often offer color-changing capabilities and dimming without a separate dimmer switch.
- Scheduling and Routines: Set lights to turn on and off at specific times, mimicking occupancy when you’re away, which can deter potential intruders.
Controlling your lights remotely means you never have to come home to a dark house again. You can also create routines that adjust lighting based on your daily schedule, improving both comfort and energy usage. The initial investment for a few smart plugs or bulbs is typically very low.
Simplifying Appliance Control with Smart Plugs
Beyond lighting, smart plugs are incredibly versatile for automating various other appliances. Anything that plugs into a standard wall outlet can potentially become ‘smart’ with the addition of a smart plug. This opens up possibilities for automating coffee makers, fans, chargers, and even holiday decorations.
Consider the benefits of turning on your coffee maker from bed, or ensuring that energy-hungry devices are completely powered off when not in use, preventing ‘vampire drain.’ This simple automation can lead to both convenience and minor energy savings over time, contributing to a more efficient home environment.
By focusing on these two functions, you get a tangible experience of smart home benefits without overcomplicating your first project or exceeding your budget. They are practical, impactful, and provide excellent value.
Essential Gear for Your Under-$100 Project
Achieving our goal of automating two basic smart home functions for under $100 requires a strategic selection of affordable yet reliable devices. The market is flooded with options, but for beginners on a budget, certain products stand out for their ease of use and cost-effectiveness. Our focus will be on Wi-Fi enabled devices that don’t require an additional hub, connecting directly to your home network.
The core of this budget-friendly setup will revolve around smart plugs and, potentially, a single smart light bulb if your budget allows. These devices are widely available from various manufacturers, often on sale, making it entirely feasible to stay within our $100 limit. It’s important to look for brands that offer intuitive apps and good user reviews.
Smart Plugs: The Versatile Workhorse
Smart plugs are the cornerstone of any budget-conscious smart home project. They are inexpensive, easy to install, and incredibly versatile. For under $100, you can typically purchase a pack of two to four smart plugs, which is more than enough to automate two functions, and even leave room for a third if you find a good deal.
- Cost-Effectiveness: Often sold in multi-packs, reducing the per-unit cost significantly.
- Ease of Installation: Simply plug them into an outlet, download the app, and connect to your Wi-Fi.
- Broad Compatibility: Most smart plugs work with major voice assistants like Amazon Alexa and Google Assistant, even without a dedicated smart speaker.
When selecting smart plugs, look for features like energy monitoring if that’s important to you, though basic on/off control is sufficient for our initial automation goals. Brands like TP-Link Kasa, Gosund, and Meross often offer reliable Wi-Fi smart plugs at competitive prices.
Consider a Single Smart Light Bulb
If you have a specific lamp you’d like to make smart and prefer the direct control of a bulb over a plug, a single smart light bulb can be a great addition. While slightly more expensive than a smart plug, many Wi-Fi enabled smart bulbs can be found for under $15-$20, especially during sales events.

These bulbs screw into standard fixtures and connect directly to your Wi-Fi. They offer features like dimming, color changes (for RGB models), and scheduling, all controllable from an app. This allows for more nuanced lighting control than a simple on/off smart plug. Philips Hue, while more premium, offers individual Wi-Fi bulbs that sometimes go on sale, but more budget-friendly options from brands like Wyze or Sengled are also excellent choices.
By focusing on smart plugs and potentially one smart bulb, you can acquire all the necessary hardware for your project well within the $100 budget, setting you up for success without overspending.
Step-by-Step Installation Guide for Beginners
Installing your first smart home devices is surprisingly straightforward, especially with Wi-Fi enabled smart plugs and bulbs. This section will walk you through the general process, ensuring you can get your two chosen functions automated quickly and efficiently. The key is to follow the manufacturer’s instructions, but the broad strokes remain consistent across most brands.
Before you begin, ensure you have your Wi-Fi network name and password handy. A stable 2.4 GHz Wi-Fi connection is usually required for these devices. Most modern routers broadcast both 2.4 GHz and 5 GHz networks, and your phone will typically connect to the appropriate one automatically during setup.
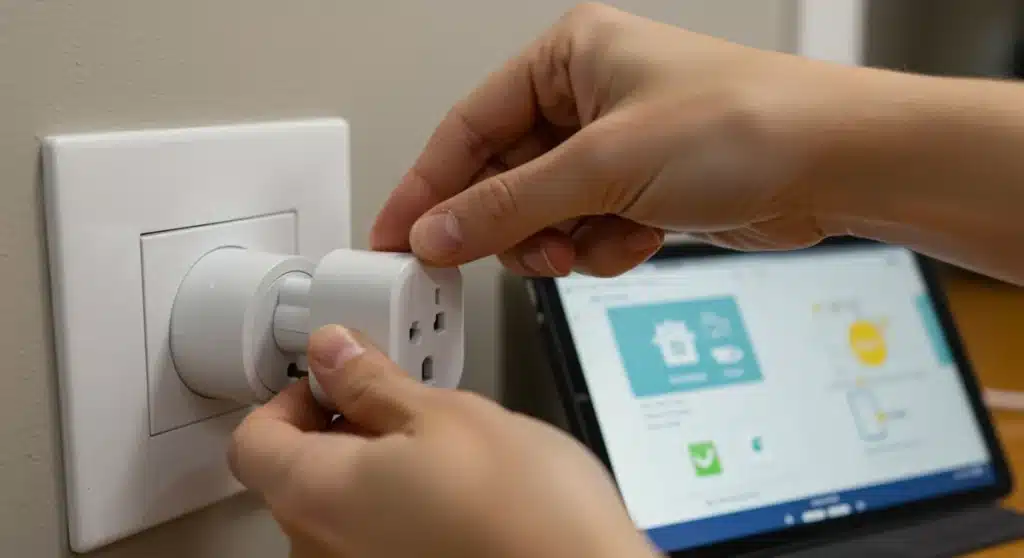
Setting Up Your Smart Plugs
The process for smart plugs is generally very similar, regardless of the brand. Let’s outline the steps:
- Download the App: Search for the manufacturer’s app (e.g., Kasa Smart, Meross, Gosund) in your smartphone’s app store. Download and install it.
- Create an Account: Open the app and create a new user account. This is usually a quick process involving your email address and a password.
- Plug In and Pair: Plug your smart plug into a wall outlet. It will usually start blinking, indicating it’s in pairing mode. In the app, tap ‘Add Device’ or a similar option, then select ‘Smart Plug.’ Follow the on-screen instructions to connect it to your home Wi-Fi. This typically involves selecting your Wi-Fi network and entering your password.
- Rename and Test: Once connected, you can rename the plug to something intuitive (e.g., ‘Living Room Lamp,’ ‘Coffee Maker’). Test it by turning it on and off via the app.
Repeat these steps for each smart plug you intend to install. This simple process makes automating appliances incredibly accessible.
Installing a Smart Light Bulb
Smart light bulbs are just as easy to set up, often integrating directly into the same app as their smart plugs from the same brand.
- Screw In the Bulb: Replace your existing light bulb with the new smart light bulb.
- Turn On Power: Ensure the light switch for that fixture is in the ‘on’ position. The bulb will likely flash or pulse, indicating pairing mode.
- Add Device in App: Open the smart home app, tap ‘Add Device,’ and select ‘Smart Light Bulb.’ Follow the prompts to connect it to your Wi-Fi network.
- Customize and Test: Once connected, you can rename the bulb, adjust its brightness, and change colors (if applicable) through the app. Test its functionality.
By following these clear steps, you’ll have your devices installed and ready for automation in no time. This hands-on experience is invaluable for building confidence in smart home technology.
Setting Up Basic Automation Routines and Schedules
Once your smart devices are installed and connected to their respective apps, the real fun begins: setting up automation routines and schedules. This is where you transform simple remote control into truly smart functionality, allowing your home to anticipate your needs and operate more efficiently. Most smart device apps offer intuitive interfaces for creating these automations.
For our initial two functions, we’ll focus on time-based schedules and simple ‘on/off’ routines. These are the easiest to configure and provide immediate, tangible benefits. You don’t need complex conditional logic for your first project; straightforward scheduling is powerful enough to make a noticeable difference in your daily life.
Scheduling Your Smart Lights
Automating your lighting can enhance both convenience and security. Consider these common scenarios:
- Morning Wake-Up: Set your bedside lamp (connected to a smart plug or using a smart bulb) to gradually turn on 15 minutes before your alarm, providing a gentler wake-up.
- Evening Ambiance: Schedule living room lamps to turn on automatically at sunset or a specific time in the evening, creating a welcoming atmosphere.
- Vacation Mode: Program lights to turn on and off at varying times while you’re away, giving the impression that someone is home to deter potential intruders.
To set a schedule, navigate to the ‘Schedules’ or ‘Routines’ section within your device’s app. Select the device, choose the desired time, and specify whether you want it to turn on or off. You can also select the days of the week for the schedule to repeat.
Automating Your Appliances with Smart Plugs
Smart plugs excel at automating ‘dumb’ appliances, bringing a new level of control and efficiency to everyday items. Here are some practical automation ideas:
- Coffee Maker Ready: Schedule your coffee maker to turn on 10 minutes before you typically wake up, ensuring a fresh brew is waiting for you.
- Energy Savings: Automate chargers for laptops or phones to turn off after a few hours, preventing overcharging and phantom power drain.
- Fan Control: Set a fan to turn on during the hottest parts of the day or to cool down a room before you arrive home.
Just like with lighting, these automations are configured within the device’s app. Look for options to set timers, schedules, or even countdowns. Many apps also offer integration with voice assistants like Alexa or Google Assistant, allowing you to control devices with simple voice commands once linked.
Successfully setting up these basic routines provides a powerful demonstration of smart home capabilities. You’ll quickly appreciate the convenience and efficiency that even simple automation brings to your home, all achieved within your budget.
Expanding Your Smart Home Horizons (Beyond $100)
Completing your first smart home project for under $100 is a significant achievement and a fantastic learning experience. It demonstrates that smart home technology is accessible and that you can successfully implement it. As you gain confidence, you might start thinking about how to expand your setup. The beauty of modular smart home devices is that you can gradually add more functionalities without overhauling your entire system.
While our initial focus was on budget-friendly Wi-Fi devices, future expansions might involve exploring different protocols, integrating more complex devices, or even investing in a dedicated smart home hub. However, always remember to consider your actual needs and budget before making new purchases. Smart home expansion should be a thoughtful process, building on your initial successes.
Integrating Voice Assistants
Many budget-friendly smart plugs and bulbs are compatible with popular voice assistants like Amazon Alexa and Google Assistant. If you already own a smart speaker (like an Echo Dot or Google Nest Mini), linking your new smart devices is a simple step within the assistant’s app. This allows for hands-free control, adding another layer of convenience.
- Voice Commands: Turn lights on/off, adjust brightness, or control appliances with simple spoken commands.
- Routine Triggers: Use voice commands to trigger more complex routines that involve multiple devices.
- Affordable Entry: Basic smart speakers are often available for under $50, making voice control an attainable upgrade.
Voice control significantly enhances the ‘smart’ aspect of your home, making interactions more natural and seamless. It’s often the next logical step after successfully automating with apps.
Considering More Advanced Devices and Hubs
As your smart home journey progresses, you might consider devices that offer more advanced functionalities, such as smart thermostats, door/window sensors, or security cameras. These often utilize different wireless protocols (Zigbee, Z-Wave) and might benefit from a central smart home hub.
A hub, like a SmartThings hub or Homey, acts as a central brain, allowing devices from different manufacturers and using different protocols to communicate with each other. While an initial investment, a hub can unlock greater automation potential and a more unified control experience. However, for a beginner’s project, sticking to Wi-Fi devices controlled via their own apps remains the most cost-effective and simplest route.
Expanding your smart home is a journey, not a race. Each successful project builds your expertise and confidence, allowing you to create a home environment that truly works for you, step by step.
Troubleshooting Common Smart Home Issues
Even with the simplest smart home setups, you might encounter minor technical glitches. Don’t be discouraged; most common issues are easily resolved with a few basic troubleshooting steps. Understanding how to diagnose and fix these problems will build your confidence and ensure your smart home continues to run smoothly. Patience is key when dealing with technology, especially when you’re learning the ropes.
The most frequent problems usually revolve around connectivity, app functionality, or device pairing. By systematically addressing these areas, you can often get your devices back online and functioning as intended without needing professional help.
Connectivity Problems
Many smart devices rely heavily on a stable Wi-Fi connection. If a device isn’t responding, connectivity is often the first place to check.
- Check Your Wi-Fi Router: Ensure your router is on and broadcasting. Sometimes, a simple router reboot can resolve intermittent connection issues.
- Device Proximity: Make sure the smart device is within a reasonable range of your Wi-Fi router. Walls and other obstructions can interfere with signals.
- 2.4 GHz Network: Confirm your device is connected to the 2.4 GHz band of your Wi-Fi, as most budget smart devices do not support 5 GHz.
If your device frequently disconnects, consider investing in a Wi-Fi extender or mesh system for better coverage, though this would be a future upgrade beyond our initial budget.
App and Device Pairing Issues
Sometimes, the device might struggle to pair with the app or respond to commands.
- Restart the Device: Unplug the smart plug or turn off the light switch for the smart bulb, wait a few seconds, and plug it back in/turn it on. This can reset the device.
- Reinstall the App: If the app is acting up, try uninstalling and reinstalling it. This can clear corrupted data or update it to the latest version.
- Factory Reset: As a last resort, perform a factory reset on the device. This usually involves holding a button on the device for several seconds until it blinks in a specific pattern. Be aware this will erase all settings, and you’ll need to pair it again.
Always consult the device’s manual or the manufacturer’s support website for specific troubleshooting steps, as procedures can vary slightly between brands. Most companies provide comprehensive online resources to help users.
By understanding these common issues and their solutions, you can confidently maintain your smart home setup and resolve problems efficiently, ensuring a smooth and enjoyable automation experience.
| Key Point | Brief Description |
|---|---|
| Budget Focus | Achieve smart home automation for two functions under $100 using cost-effective devices. |
| Core Devices | Utilize Wi-Fi enabled smart plugs and potentially a single smart light bulb for simplicity. |
| Automation Goals | Automate lighting and appliance control for enhanced convenience and efficiency. |
| Ease of Setup | Simple installation and app-based scheduling make smart home accessible for beginners. |
Frequently asked questions about your first smart home project
The absolute essentials for a budget-friendly first smart home project are Wi-Fi enabled smart plugs. These versatile devices allow you to automate traditional lamps and small appliances without needing a separate hub. Look for multi-packs to maximize savings and ensure compatibility with a user-friendly smartphone app for easy control and scheduling.
Absolutely. By focusing on smart plugs, which often come in packs of two or four for around $20-$40, you can easily automate two distinct functions like a lamp and a coffee maker. Even adding a single budget-friendly smart bulb can often keep you under the $100 mark, especially during sales events.
No, for this initial project focused on Wi-Fi enabled smart plugs and bulbs, a dedicated smart home hub is not required. These devices connect directly to your home Wi-Fi network and are controlled via their manufacturer’s smartphone app. This simplifies the setup process and helps keep your project well within budget.
The easiest functions for a beginner to automate are lighting and small appliance control. Using smart plugs for lamps, fans, or coffee makers allows for simple on/off scheduling and remote control. These types of automations provide immediate, noticeable benefits without complex configurations, building confidence for future projects.
Most connection issues stem from Wi-Fi problems. Ensure your router is working correctly and your device is within range, connected to the 2.4 GHz network. Try restarting the device and your router. If problems persist, consult the device’s manual for specific troubleshooting or a factory reset, then re-attempt the pairing process.
Conclusion
Embarking on your first smart home project for under $100 is not just feasible, it’s an incredibly rewarding experience that demystifies smart home technology. By focusing on practical, high-impact automations like lighting and appliance control using affordable Wi-Fi smart plugs and bulbs, you can significantly enhance your home’s convenience and efficiency. This initial step provides a solid foundation, allowing you to gradually expand your smart home capabilities at your own pace and budget. The journey into smart living begins with a single, well-planned project, proving that a smarter home is within everyone’s reach.


