DIY Smart Door Lock Installation 2026: Enhance Home Security
The 2026 Guide to DIY Smart Door Lock Installation: Enhance Home Security in 6 Simple Steps
Welcome to the future of home security! In an increasingly connected world, protecting your home and loved ones has never been more critical, or more accessible. Gone are the days when advanced security systems were the exclusive domain of professionals. Today, with a little guidance and the right tools, you can transform your home’s entry points into fortresses of smart technology. This comprehensive 2026 guide is designed to empower you with the knowledge and confidence to undertake a DIY Smart Lock installation, enhancing your home security with cutting-edge features and unparalleled convenience.
The landscape of home security has evolved dramatically, and smart door locks stand at the forefront of this revolution. These aren’t just fancy gadgets; they are integral components of a modern smart home ecosystem, offering features that traditional locks simply cannot match. From keyless entry and remote access control to integration with other smart devices, a DIY Smart Lock installation promises not only enhanced security but also a significant upgrade to your daily life. Imagine never fumbling for keys again, granting access to trusted visitors from anywhere in the world, or receiving instant notifications about who enters and exits your home. These are just a few of the conveniences that await you.
This guide will walk you through everything you need to know, from understanding the various types of smart locks available in 2026 to a detailed six-step installation process. We’ll cover essential tools, troubleshooting tips, and how to seamlessly integrate your new smart lock into your existing smart home setup. Whether you’re a seasoned DIY enthusiast or a newcomer eager to embrace smart home technology, this article is your ultimate resource for a successful and secure DIY Smart Lock project. Let’s unlock the potential of a smarter, safer home together!
Why Choose a Smart Door Lock in 2026? The Benefits Unlocked
As we navigate through 2026, the reasons to upgrade to a smart door lock are more compelling than ever. Beyond the ‘cool factor,’ these devices offer tangible benefits that address modern security concerns and lifestyle demands. Understanding these advantages is the first step in appreciating the value a DIY Smart Lock brings to your home.
Enhanced Security Features
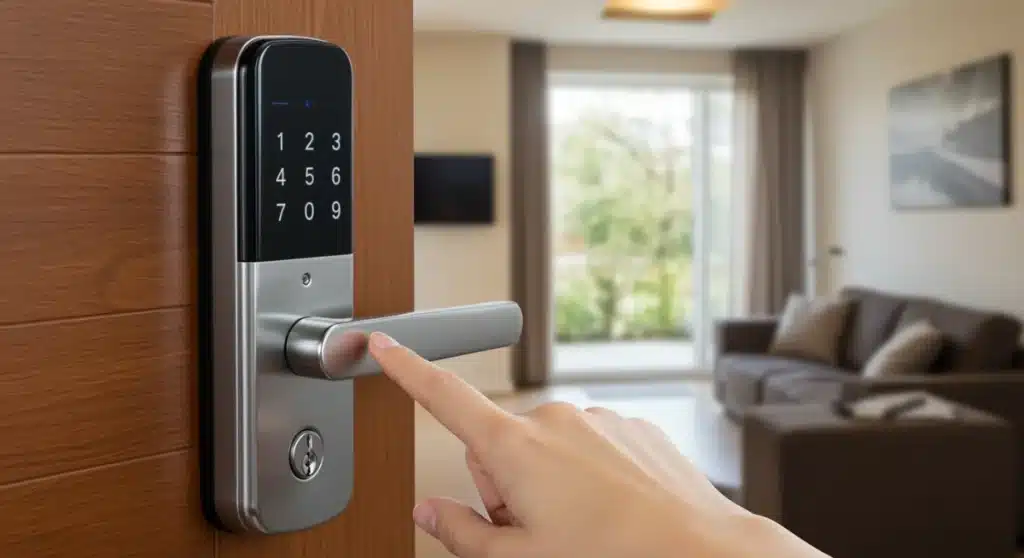
- Keyless Entry: Say goodbye to lost keys and inconvenient lockouts. Smart locks offer multiple keyless entry options, including keypads, fingerprint readers, and smartphone apps. This not only adds convenience but also eliminates the vulnerability of physical keys being copied or stolen.
- Remote Access and Monitoring: One of the most significant advantages is the ability to lock and unlock your door from anywhere using your smartphone. Did you forget to lock up? No problem. Need to let a delivery person in? Grant temporary access with ease. Most smart locks also provide activity logs, allowing you to monitor who enters and exits your home and when.
- Temporary Access Codes: For guests, pet sitters, or service providers, you can generate unique, temporary access codes that expire after a set time or number of uses. This provides controlled access without sharing your primary codes or physical keys.
- Tamper Alerts: Many smart locks come equipped with built-in alarms that trigger if someone attempts to tamper with the lock or force entry. These alerts can be sent directly to your smartphone, giving you immediate notification of potential security breaches.
Seamless Integration with Smart Home Ecosystems
The true power of a DIY Smart Lock is realized when it integrates with your broader smart home system. In 2026, compatibility is better than ever, allowing your lock to communicate with other devices for enhanced automation and security.
- Voice Assistant Compatibility: Control your lock with simple voice commands through Amazon Alexa, Google Assistant, or Apple HomeKit. Imagine saying, "Alexa, lock the front door" as you head to bed.
- Automated Routines: Set up routines where your smart lock triggers other actions. For example, when you unlock your front door, your lights can turn on, and your thermostat can adjust to your preferred temperature. Conversely, locking the door can arm your security system and turn off all lights.
- Video Doorbell Integration: Pair your smart lock with a video doorbell to see who’s at your door before granting them access, even when you’re not home. This adds an extra layer of visual verification to your security.
Convenience and Peace of Mind
Beyond security, smart locks offer unparalleled convenience that simplifies daily life.
- Never Lose Your Keys Again: Forgetting or losing keys is a common headache. With keyless entry, this worry becomes a thing of the past.
- Easy Entry for Family: Children can enter the house with their own codes, eliminating the need for them to carry physical keys, which they might lose.
- Increased Property Value: As smart home technology becomes standard, installing a smart lock can be an attractive feature for potential buyers, potentially increasing your home’s market value.
Choosing the Right Smart Lock for Your DIY Project
The market for smart door locks in 2026 is diverse, offering a wide array of features, designs, and connectivity options. Selecting the perfect smart lock for your DIY Smart Lock installation is crucial for ensuring compatibility, functionality, and satisfaction. Here’s what to consider:
Types of Smart Locks
- Deadbolt Replacement Locks: These are the most common type, replacing your existing deadbolt with a smart mechanism. They often retain the exterior handle and interior knob/lever. Examples include August Smart Lock Pro and Schlage Encode.
- Lever Handle Locks: Some smart locks integrate the smart technology directly into the door handle. These are suitable for doors without a separate deadbolt or for interior doors.
- Retrofit Locks: These devices attach to your existing deadbolt’s interior thumb turn, converting it into a smart lock without changing the exterior hardware. They are great for renters or those who want to maintain the aesthetic of their current door.
Connectivity Options
How your smart lock communicates with your smartphone and other smart home devices is vital.
- Bluetooth: Good for close-range control, typically within your home. It’s energy-efficient but lacks remote access without a bridge.
- Wi-Fi: Offers direct remote access without a separate hub, making it very convenient. However, it can consume more battery power.
- Z-Wave/Zigbee: These are mesh network protocols commonly used in smart home systems. They require a compatible smart home hub (e.g., SmartThings, Hubitat) but offer excellent range, reliability, and battery life, as the lock communicates with the hub, not directly with your Wi-Fi router.
- Matter/Thread: Emerging standards in 2026, offering enhanced interoperability, security, and low power consumption. Locks supporting these protocols are highly recommended for future-proofing your smart home.
Power Source
Most smart locks are battery-powered (typically AA or AAA batteries). Consider battery life indicators and ease of battery replacement. Some high-end models might offer wired options, but these are less common for DIY installations.
Keypad/Entry Options
- Numeric Keypad: The most common keyless entry method. Look for backlit keypads for night visibility.
- Fingerprint Reader: Offers biometric security for quick and secure access.
- Touchscreen: Sleek and modern, but can sometimes be less responsive in extreme weather or with gloves.
- Physical Key Override: A crucial backup. Ensure your chosen smart lock still allows for a traditional physical key entry in case of battery failure or system malfunction.
Compatibility with Your Door
Before purchasing, measure your door’s thickness and existing bore holes to ensure the smart lock will fit. Most smart locks are designed for standard door preparations, but it’s always best to double-check the product specifications.
Budget and Brand Reputation
Smart locks range widely in price. Determine your budget and research reputable brands known for their security, reliability, and customer support. Popular brands in 2026 include August, Schlage, Yale, Kwikset, and Level.
Pre-Installation Checklist: Getting Ready for Your DIY Smart Lock
Preparation is key to a smooth and successful DIY Smart Lock installation. Before you even unbox your new lock, take some time to gather your tools and ensure your door is ready. This pre-installation checklist will save you time and prevent potential headaches.
Tools You’ll Need:
- Phillips Head Screwdriver: Essential for most smart lock installations.
- Flathead Screwdriver: May be needed for prying or specific screws.
- Measuring Tape: To verify door dimensions and lock compatibility.
- Pencil: For marking screw holes or alignment points.
- Drill (Optional, but Recommended): Only if you need to enlarge existing holes or drill new ones (less common for direct replacements). Ensure you have appropriate drill bits.
- Safety Glasses: Always protect your eyes when working with tools.
- Gloves: To protect your hands and provide a better grip.
- Painter’s Tape (Optional): To protect your door’s finish during installation.
Verify Door Compatibility:
- Door Thickness: Most smart locks accommodate standard door thicknesses (typically 1 3/8" to 2 1/4"). Check your door and the lock’s specifications.
- Backset: This is the distance from the edge of the door to the center of the bore hole (where the lock cylinder goes). Standard backsets are 2 3/8" or 2 3/4". Your new smart lock should be compatible with your existing backset.
- Bore Hole Diameter: The diameter of the hole in the door where the lock cylinder sits. Standard is 2 1/8".
- Cross Bore Diameter: The smaller hole on the edge of the door for the latch bolt. Standard is 1".
Remove Your Old Lock:
Before installing your new DIY Smart Lock, you’ll need to carefully remove your existing deadbolt and any associated hardware.
- Unlock the Door: Ensure the door is unlocked and open.
- Remove Interior Thumb Turn/Lever: Locate the screws on the interior side of your existing deadbolt. Use your screwdriver to remove them.
- Separate Interior and Exterior Halves: Once the screws are removed, the interior and exterior portions of the deadbolt should separate easily.
- Remove Latch Mechanism: There will be two screws holding the latch mechanism in the edge of the door. Remove these screws and pull out the latch.
- Remove Strike Plate: Unscrew the strike plate from the door frame. You may or may not reuse this, depending on your new smart lock.
Keep all removed hardware in a safe place, especially if you’re renting and might need to reinstall the old lock later.
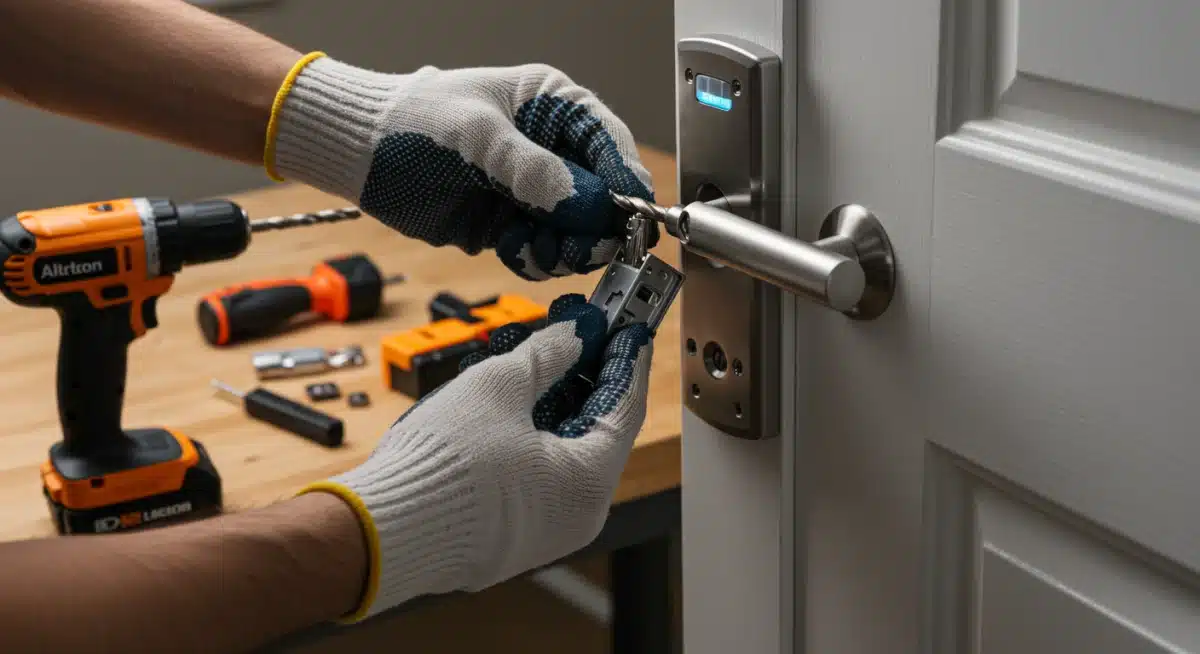
The 6 Simple Steps to DIY Smart Lock Installation 2026
With your preparations complete and your old lock removed, you’re ready for the exciting part: installing your new DIY Smart Lock. While specific instructions may vary slightly by model, these six general steps will guide you through the process.
Step 1: Install the Latch Bolt
This is the mechanism that extends from the edge of your door into the door frame, securing the door when locked. Most smart locks come with an adjustable latch bolt that fits both standard backsets (2 3/8" and 2 3/4"). Adjust it if necessary to match your door’s backset.
- Insert Latch Bolt: Slide the new latch bolt into the cross bore hole on the edge of your door. Ensure the "UP" arrow (if present) is facing upwards and the bevelled side of the latch faces the door frame.
- Secure with Screws: Use the provided screws to secure the latch bolt to the edge of the door. Do not overtighten them, as this can strip the wood or metal.
- Test Latch: Extend and retract the latch bolt a few times to ensure it moves smoothly.
Step 2: Install the Exterior Keypad/Assembly
This is the part of the smart lock that faces outside your home, typically containing the keypad, keyhole, or fingerprint reader.
- Align and Insert: Carefully feed the cable from the exterior assembly through the larger bore hole in the door. Ensure the tailpiece (the metal bar that connects to the interior mechanism) is correctly oriented to go through the latch bolt’s center hole.
- Position Exterior Assembly: Press the exterior assembly flush against the door, making sure it’s straight and level.
Step 3: Install the Interior Mounting Plate
This plate provides the base for the interior assembly and secures the exterior component.
- Route Cable: Ensure the cable from the exterior assembly is threaded through the central hole in the interior mounting plate.
- Secure Plate: Position the mounting plate against the door on the interior side, aligning it with the exterior assembly and the tailpiece. Secure it to the exterior assembly using the long screws provided. Again, do not overtighten.
- Verify Alignment: Double-check that both the exterior assembly and the mounting plate are plumb and level. Misalignment can cause operational issues.
Step 4: Connect the Cable and Install the Interior Assembly
This is where the electronics come into play. The interior assembly houses the battery pack and the motor that operates the lock.
- Connect Cable: Carefully plug the cable from the exterior assembly into the designated port on the interior assembly. Ensure a snug fit without forcing it.
- Attach Interior Assembly: Position the interior assembly over the mounting plate, ensuring the tailpiece correctly engages with the turning mechanism on the interior assembly.
- Secure Interior Assembly: Use the shorter screws provided to attach the interior assembly to the mounting plate.
Step 5: Install Batteries and Perform Handing Process
Once the lock is physically installed, it needs power and a little calibration.
- Insert Batteries: Open the battery cover on the interior assembly and insert the recommended number and type of batteries (usually AA or AAA).
- Perform Handing Process (Crucial!): Most smart locks require a "handing" or "door-sensing" process. This teaches the lock which way the door swings and which direction to extend the deadbolt. Follow your specific lock’s instructions carefully for this step. It often involves pressing a button while the door is open and then closed, allowing the lock to calibrate. This step is vital for proper operation.
Step 6: Install the Strike Plate
The strike plate is the metal piece on the door frame that the latch bolt extends into when locked.
- Align Strike Plate: Hold the new strike plate against the door frame, aligning it with the latch bolt. Ensure the latch bolt can smoothly enter and exit the plate’s opening.
- Mark Holes: Use a pencil to mark the screw holes.
- Secure Strike Plate: Screw the new strike plate into the door frame using the provided screws. Make sure it’s flush with the frame.
- Test Operation: Close the door and manually lock and unlock the smart lock a few times from both the interior and exterior. Ensure it operates smoothly without binding or resistance. If it binds, you may need to adjust the strike plate or the lock’s alignment.
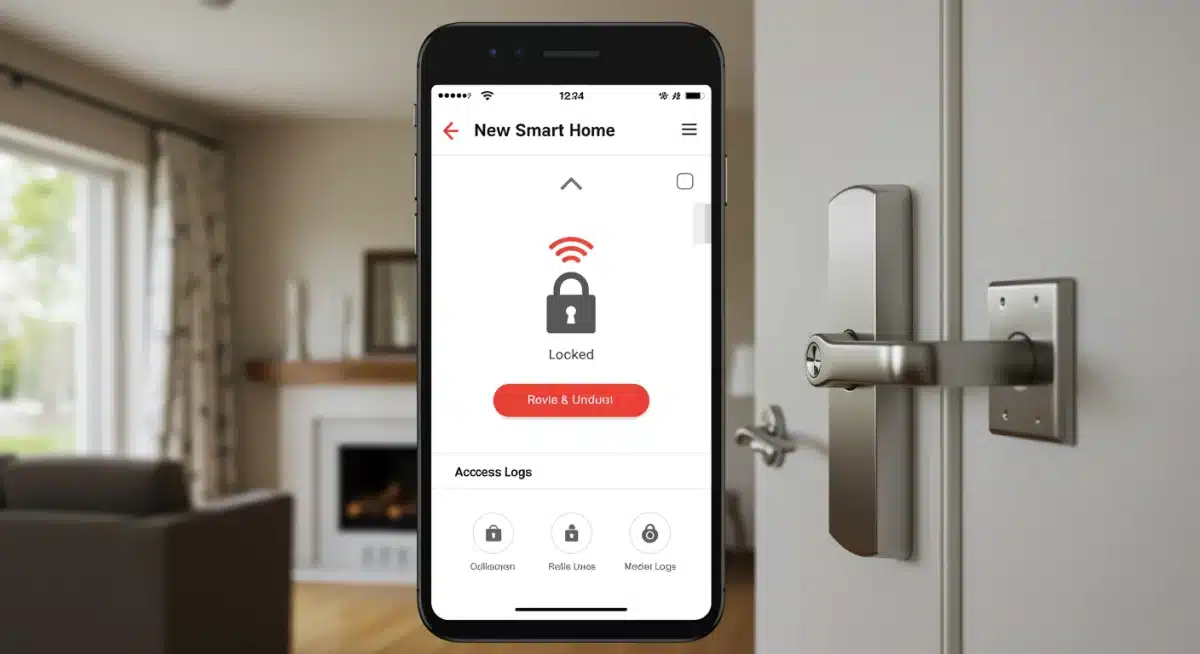
Configuring Your DIY Smart Lock: App Integration and Advanced Features
Physical installation is just the beginning. The real magic of your DIY Smart Lock comes alive through its digital configuration and integration with your smart home ecosystem. This section will guide you through connecting your lock to its companion app and exploring advanced features.
Downloading the Companion App
Every smart lock comes with a dedicated mobile application for setup, control, and management. This is your command center.
- Find the App: Search for your smart lock brand’s official app in the Apple App Store (for iOS) or Google Play Store (for Android).
- Create an Account: Follow the on-screen prompts to create a new user account if you don’t already have one. This typically involves entering your email and creating a password.
Pairing Your Smart Lock
The pairing process connects your physical lock to your digital app.
- Follow In-App Instructions: The app will walk you through the pairing process, which often involves putting your lock into a "pairing mode" (usually by pressing a button on the interior assembly) and then allowing the app to discover it via Bluetooth or Wi-Fi.
- Name Your Lock: Give your lock a descriptive name (e.g., "Front Door Lock," "Garage Entry") for easy identification, especially if you plan to install multiple smart locks.
Setting Up Keyless Entry Options
Now, customize how you and others will access your home.
- Master Code: Set up your primary access code for the keypad. Memorize it or store it securely.
- User Codes: Create unique codes for family members, friends, or service providers. Many apps allow you to set schedules for these codes (e.g., valid only on weekdays from 9 AM to 5 PM).
- Fingerprint (if applicable): Follow the app’s instructions to register fingerprints for biometric entry.
- Auto-Lock Feature: Configure your lock to automatically re-lock after a set period (e.g., 30 seconds, 1 minute) after being unlocked. This is a fantastic security feature to prevent accidental unlatched doors.
Integrating with Smart Home Hubs and Voice Assistants
Maximize your DIY Smart Lock‘s potential by connecting it to your broader smart home ecosystem.
- Identify Your Ecosystem: Determine if you use Amazon Alexa, Google Home, Apple HomeKit, SmartThings, Hubitat, or another platform.
- Enable Skill/Add Device: In your smart home app (e.g., Alexa app, Google Home app), search for the "skill" or "device integration" for your smart lock brand. Follow the steps to link your smart lock account to your smart home platform.
- Create Routines/Automations: Once integrated, you can set up powerful automations. Examples include:
- "Goodnight" routine: Locks all doors, turns off lights, adjusts thermostat.
- "Welcome Home" routine: Unlocks front door (only with specific authentication), turns on entry lights.
- "Away" routine: Locks doors, arms security system.
- Voice Control: Test voice commands. For security, most voice assistants require a PIN or voice match to unlock doors via voice.
Troubleshooting Common DIY Smart Lock Installation Issues
Even with careful planning, minor hiccups can occur during a DIY Smart Lock installation. Don’t fret! Most issues are easily resolvable. Here are some common problems and their solutions:
1. Lock Mechanism Binds or Doesn’t Extend Smoothly
- Cause: Misalignment of the lock components or the strike plate.
- Solution:
- Recheck Alignment: Ensure the exterior and interior assemblies are perfectly straight and level on the door. Loosen screws slightly, adjust, and re-tighten.
- Adjust Latch Bolt: Make sure the latch bolt is properly seated and not rubbing against the door frame.
- Adjust Strike Plate: The strike plate on the door frame might be slightly off. Loosen its screws, close the door, and observe where the deadbolt hits. Adjust the strike plate’s position so the deadbolt enters smoothly. You might need to slightly enlarge the hole in the door frame (using a file or chisel) if the deadbolt consistently catches.
- Door Sag: Over time, doors can sag, causing misalignment. Check if your door sags or if the hinges are loose.
2. Lock Doesn’t Respond to Keypad/App Commands
- Cause: Dead batteries, incorrect handing, or connectivity issues.
- Solution:
- Check Batteries: This is the most common culprit. Replace with fresh, high-quality alkaline batteries.
- Perform Handing Process Again: If the lock wasn’t properly calibrated to your door’s swing direction, it won’t operate correctly. Refer to your lock’s manual and repeat the handing process.
- Check Connectivity: Ensure your Wi-Fi network is stable (for Wi-Fi locks) or your smart home hub is online and within range (for Z-Wave/Zigbee locks). If using Bluetooth, ensure your phone is close enough.
- Restart Lock/Router: Sometimes a simple power cycle of the lock (remove and reinsert batteries) or your Wi-Fi router can resolve connectivity glitches.
3. Difficulty Pairing with the App or Smart Home Hub
- Cause: Incorrect pairing mode, signal interference, or outdated firmware.
- Solution:
- Follow App Instructions Precisely: Ensure you’re putting the lock into the correct pairing mode as instructed by the app.
- Reduce Interference: Move closer to the lock with your phone or hub. Ensure there are no large metal objects directly between the lock and your router/hub.
- Check Firmware: After initial pairing, check the lock’s app for any available firmware updates. Keeping firmware current can resolve bugs and improve connectivity.
- Reset Lock: As a last resort, perform a factory reset on the smart lock (refer to your manual for instructions). This will erase all settings and allow you to start the pairing process fresh.
4. Keypad Not Lighting Up or Responding
- Cause: Dead batteries or a loose cable connection.
- Solution:
- Replace Batteries: Always the first step.
- Check Cable Connection: Re-open the interior assembly and ensure the cable from the exterior keypad is securely plugged into the interior module.
5. Auto-Lock Feature Not Working Correctly
- Cause: Incorrect settings or door sensor issues.
- Solution:
- Review App Settings: Double-check the auto-lock delay settings in your smart lock app.
- Check Door Sensor (if applicable): Some smart locks use a separate door sensor to detect if the door is open or closed. Ensure this sensor is properly installed and aligned.
When in doubt, always consult your smart lock’s specific user manual and the manufacturer’s online support resources. They often have detailed troubleshooting guides and FAQs tailored to your exact model.
Maintaining Your Smart Lock for Long-Term Security
A successful DIY Smart Lock installation is just the beginning. To ensure your investment continues to provide optimal security and convenience for years to come, regular maintenance and attention are essential. Here’s how to keep your smart lock in peak condition in 2026 and beyond.
Battery Management: The Lifeline of Your Smart Lock
- Regular Checks: Most smart locks provide battery life indicators in their companion apps. Make it a habit to check these periodically. Don’t wait for the "low battery" warning to become critical.
- Proactive Replacement: Even if the app says batteries are "medium," consider replacing them every 6-12 months, especially before extreme weather changes (cold can drain batteries faster).
- Quality Batteries: Always use high-quality alkaline batteries. Avoid rechargeable batteries unless specifically recommended by the manufacturer, as their voltage output can sometimes differ and affect performance.
- Physical Key Backup: Always keep your physical key in a safe, accessible place outside your home (e.g., with a trusted neighbor or in a secure lockbox) in case of unexpected battery failure.
Software and Firmware Updates: Staying Ahead of Threats
- Enable Automatic Updates: If your smart lock app offers automatic firmware updates, enable this feature. These updates often include critical security patches, bug fixes, and new features.
- Manual Checks: Periodically check the app for manual update prompts. Manufacturers are constantly improving their software, and staying current is vital for security and optimal performance.
- Security Vulnerabilities: Outdated software can create security vulnerabilities that hackers might exploit. Staying updated is your first line of digital defense.
Physical Maintenance: Keeping It Smooth
- Clean Keypad/Sensor: Regularly wipe down the keypad or fingerprint sensor with a soft, dry cloth to remove dirt, grease, and smudges that can interfere with operation. Avoid harsh chemicals.
- Lubrication (Minimal): If the mechanical parts of your lock start to feel stiff, a tiny amount of graphite lubricant (never oil-based lubricants, which can attract dirt) can be applied to the deadbolt mechanism or keyway (if present). Consult your manufacturer’s guide first, as some advise against lubrication.
- Door Condition: Ensure your door remains in good condition. A warped door or loose hinges can put undue stress on the lock mechanism and affect its alignment and operation. Address any door issues promptly.
Reviewing Access Logs and Codes
- Regular Log Review: Periodically check the activity logs in your smart lock app. This helps you monitor who has entered and exited your home and can flag any unusual activity.
- Revoke Old Codes: If a contractor or guest no longer needs access, promptly revoke their temporary access codes. This is a crucial security practice.
- Change Master Code: Consider changing your master access code periodically, especially if you’ve shared it or suspect it might be compromised.
Network Security
- Strong Wi-Fi Password: Ensure your home Wi-Fi network has a strong, unique password.
- Guest Network: Consider setting up a separate guest Wi-Fi network for visitors to keep your main network, and thus your smart home devices, more secure.
By following these maintenance tips, your DIY Smart Lock will continue to be a reliable and secure guardian of your home, offering peace of mind and effortless convenience for years to come.
The Future of Home Security: What to Expect Beyond 2026
As you complete your DIY Smart Lock installation in 2026, it’s exciting to consider what lies ahead for home security technology. The pace of innovation is relentless, and smart locks are poised to become even more intelligent, integrated, and intuitive. Here’s a glimpse into the near future:
Enhanced Biometrics and Multi-Factor Authentication
- Advanced Facial Recognition: Beyond simple fingerprint scanning, future smart locks may incorporate more sophisticated facial recognition technology, potentially even differentiating between individuals and pets.
- Gait Analysis: Imagine your home recognizing you by your unique walking pattern as you approach the door, unlocking it seamlessly.
- Behavioral Biometrics: Locks might learn your habits and routines, adjusting security protocols based on unusual behavior patterns.
- Seamless Multi-Factor Authentication: Combining several authentication methods (e.g., facial recognition + voice command or fingerprint + proximity sensor) will become even more frictionless and secure, moving beyond cumbersome PINs.
Deeper AI and Machine Learning Integration
- Predictive Security: AI will analyze patterns from your lock’s activity logs, weather data, local crime rates, and even social media trends to predict potential security risks and proactively adjust your home’s defenses.
- Adaptive Security Modes: Your smart lock could automatically switch to a higher security mode (e.g., requiring dual authentication, increasing sensitivity of tamper alerts) when it detects unusual activity in your neighborhood or when you’re away on vacation.
- Personalized Access Control: AI could learn individual preferences, granting access to specific areas of your home only at certain times for particular family members or visitors, based on established patterns.
Energy Harvesting and Longer Battery Life
- Kinetic Energy Harvesting: Future locks might generate power from the act of opening and closing the door, significantly extending battery life or even eliminating the need for battery replacement altogether.
- Solar Charging: Small, integrated solar panels could trickle-charge batteries on exterior components, especially for homes with direct sunlight exposure.
- Ultra-Low Power Protocols: Continued advancements in communication protocols like Thread will lead to devices that sip power, allowing for years of operation on a single charge.
Hyper-Integration with Smart Cities and Services
- Delivery Integration: Seamless, secure integration with package delivery services, allowing one-time access for deliveries directly into your home or a secure package drop-off area.
- Emergency Services Access: In a medical emergency, authorized first responders could be granted secure, temporary access to your home via your smart lock, potentially saving critical time.
- Smart City Ecosystems: Your home’s smart lock could become a node in a larger smart city network, contributing to overall community safety and efficiency (with robust privacy safeguards, of course).
Invisible and Aesthetic Integration
- Hidden Technology: Smart lock technology will become even more discreet, with mechanisms seamlessly integrated into door designs, maintaining traditional aesthetics while offering advanced security.
- Modular and Customizable: Expect more modular designs, allowing homeowners to easily upgrade specific components (e.g., biometric sensor, communication module) without replacing the entire lock.
The journey of home security is one of continuous innovation. By undertaking a DIY Smart Lock installation today, you are not just securing your home for 2026, but also stepping into an exciting future where technology makes our living spaces safer, smarter, and more responsive to our needs.
Conclusion: Your Smarter, Safer Home Awaits with DIY Smart Lock Installation
Congratulations! By reaching this point, you’ve gained a comprehensive understanding of how to execute a successful DIY Smart Lock installation in 2026. You’ve learned about the myriad benefits, from unparalleled convenience and enhanced security features like keyless entry and remote access, to seamless integration with your smart home ecosystem. We’ve guided you through selecting the right smart lock, preparing your door, and following a clear, six-step installation process. Furthermore, we’ve equipped you with essential troubleshooting tips and a vital maintenance plan to ensure your smart lock performs optimally for years to come, anticipating future innovations.
Embracing smart home technology, particularly a smart door lock, is more than just installing a new gadget; it’s an investment in peace of mind and a step towards a more efficient, secure, and modern lifestyle. The ability to monitor your home, grant access remotely, and eliminate the worries of lost keys transforms your daily routine and significantly elevates your home’s protection. The proactive steps of regular battery checks, software updates, and physical maintenance are small efforts that yield immense returns in terms of reliability and security.
As the world continues to evolve, so too will the capabilities of our smart homes. Your newly installed DIY Smart Lock is not just a device; it’s a gateway to the future of home automation and security. It represents your commitment to leveraging technology to create a safer, smarter environment for yourself and your loved ones. So, take pride in your accomplishment, enjoy the newfound convenience, and rest easy knowing that your home is secured by the intelligence of a modern smart lock. The future of home security is here, and you’ve successfully unlocked it.


