DIY Smart Garden: Automated Watering & Monitoring for Under $250
Creating a DIY smart garden with automated watering and monitoring for $250 involves selecting the right components like a Raspberry Pi or Arduino, moisture sensors, a water pump, and scheduling software to efficiently manage and monitor your garden’s needs.
Dreaming of a garden that practically takes care of itself? You can achieve this with a **DIY smart garden with automated watering and monitoring for $250**. Let’s explore how to build your smart garden without breaking the bank.
Why Build a DIY Smart Garden?
Building a DIY smart garden isn’t just about automating tasks; it’s about creating a more efficient, sustainable, and enjoyable gardening experience. By automating watering and monitoring, you can eliminate guesswork and ensure your plants receive the precise care they need.
Here are a few compelling reasons to embark on this project:
Save Water and Time
Automated watering systems deliver water only when and where it’s needed, minimizing waste and freeing up your time for other activities. No more daily trips to the garden with a watering can!
Optimize Plant Health
Consistent moisture levels, monitored by sensors, prevent overwatering or underwatering, leading to healthier, more productive plants. Your plants will thank you.
Learn New Skills
Building a smart garden involves electronics, programming, and gardening, offering a fantastic opportunity to learn and apply valuable skills. It’s a fun and educational project.

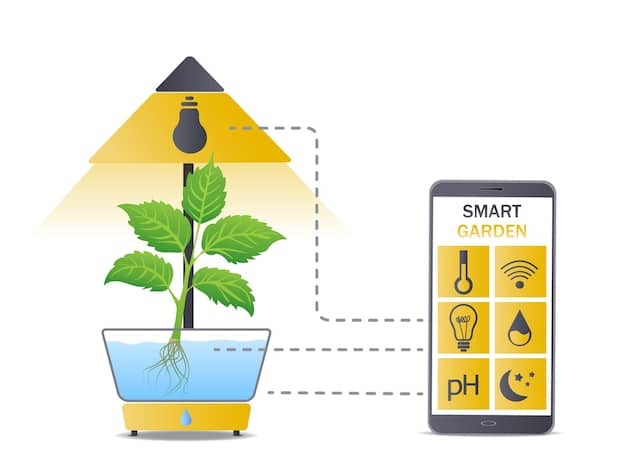
Remote Monitoring
With a connected system, you can monitor your garden’s conditions from anywhere, making it ideal for vacations or busy schedules. You’ll always know what’s happening in your garden.
Ready to get started? Here are some key components you’ll need:
- Microcontroller (Raspberry Pi or Arduino): The brain of your smart garden.
- Soil Moisture Sensors: To measure the moisture levels in your soil.
- Water Pump: To deliver water to your plants.
- Relay Module: To control the water pump.
- Tubing and Connectors: To create the watering system.
With these basics covered, you can begin planning your DIY smart garden.
Planning Your Smart Garden
Before you start buying components and writing code, it’s essential to plan your smart garden. This involves considering your garden’s needs, choosing the right location, and designing the layout of your automated watering system.
Here are some key steps to guide you through the planning process:
Assess Your Garden’s Needs
Consider the types of plants you’re growing, their watering requirements, and the amount of sunlight they receive. This will help you determine the optimal watering schedule and sensor placement.
Choose the Right Location
Select a location that’s easily accessible to a power source and, ideally, a water source. This will simplify the installation process and reduce the need for long extension cords or hoses.
Design Your Watering System Layout
Decide how you want to distribute water to your plants. Drip irrigation is a popular choice for its efficiency and precision, but you may also consider using sprinklers or soaker hoses. Plan the placement of tubing, connectors, and emitters to ensure even coverage.
Select Your Microcontroller
Choose between a Raspberry Pi or an Arduino based on your experience and the complexity of your project. A Raspberry Pi offers more processing power and connectivity options but may require more programming knowledge. An Arduino is simpler to use and ideal for basic automation tasks.
Create a Budget
Set a budget for your project and stick to it. This will help you prioritize components and avoid overspending. Remember, the goal is to create a functional smart garden for under $250.
With careful planning, you can ensure that your DIY smart garden meets your needs and stays within your budget.
Selecting the Right Components
Choosing the right components is crucial for the success of your DIY smart garden. You’ll need to consider factors like cost, functionality, and compatibility when selecting each part.
Let’s take a closer look at some essential components:
Microcontroller: Raspberry Pi or Arduino?
The microcontroller is the brain of your smart garden, responsible for processing sensor data and controlling the watering system. Raspberry Pi and Arduino are two popular choices, each with its strengths and weaknesses.
Raspberry Pi:
- More processing power and memory.
- Supports complex programming languages like Python.
- Built-in Wi-Fi and Ethernet connectivity.
- Higher power consumption.
- Requires more technical expertise.
Arduino:
- Simpler to use and program.
- Low power consumption.
- Ideal for basic automation tasks.
- Limited processing power and memory.
- Requires additional modules for Wi-Fi connectivity.
For most DIY smart garden projects, an Arduino is a great choice due to its simplicity and low cost. However, if you plan to implement advanced features like remote monitoring or data logging, a Raspberry Pi may be a better option.
Soil Moisture Sensors
Soil moisture sensors measure the water content in the soil, allowing your microcontroller to determine when to water your plants. There are two main types of soil moisture sensors:
- Resistive Sensors: Simple and inexpensive, but prone to corrosion.
- Capacitive Sensors: More accurate and durable, but also more expensive.
Choose capacitive sensors for long-term reliability and accuracy, even though they cost a bit more upfront.
Water Pump and Relay Module
The water pump delivers water to your plants, and the relay module controls the pump based on signals from the microcontroller. Select a pump with sufficient flow rate for your garden size and a relay module that is compatible with your microcontroller’s voltage.
Power Supply
Ensure you have a reliable power supply for your microcontroller, sensors, and water pump. Consider using a USB power adapter or a battery pack, depending on your garden’s location and power availability.
By carefully selecting each component, you can build a reliable and efficient DIY smart garden that meets your specific needs.
Assembling Your Smart Garden System
Once you’ve gathered all the necessary components, it’s time to assemble your DIY smart garden system. This involves connecting the sensors, water pump, and relay module to your microcontroller and setting up the watering system.
Here’s a step-by-step guide to help you through the assembly process:
Connect the Soil Moisture Sensors
Connect the soil moisture sensors to your microcontroller according to the manufacturer’s instructions. Typically, this involves connecting the sensor’s power, ground, and signal pins to the corresponding pins on the microcontroller.
Wire the Relay Module
Wire the relay module to your microcontroller to control the water pump. Connect the relay’s control pin to a digital output pin on the microcontroller and the relay’s power and ground pins to a power source.
Connect the Water Pump
Connect the water pump to the relay module and a power source. Ensure that the pump is properly grounded and that the wiring is secure to prevent electrical hazards.
Set Up the Watering System
Connect the water pump to the tubing and emitters, and position them strategically throughout your garden. Make sure the tubing is securely connected to prevent leaks and that the emitters are placed near the plants’ root zones.
Test the System
Before deploying your smart garden system, thoroughly test it to ensure that all components are working correctly. Use a multimeter to check the voltage levels and continuity of the wiring. Manually trigger the water pump to verify that it delivers water to the plants.
With careful assembly and testing, you can ensure that your DIY smart garden system is safe, reliable, and ready to automate your gardening tasks.
Programming Your Smart Garden
Programming is where your smart garden truly comes to life. You’ll need to write code that reads data from the soil moisture sensors, makes decisions about when to water, and controls the water pump via the relay module.
Here’s an overview of the key programming steps:
Set Up Your Development Environment
Install the necessary software and libraries for your microcontroller. For Arduino, download the Arduino IDE. For Raspberry Pi, use the Python programming language with appropriate libraries.
Read Sensor Data
Write code to read the analog or digital values from the soil moisture sensors. Calibrate the sensors to ensure accurate readings and convert the values to meaningful moisture levels.
Implement Watering Logic
Define a watering threshold based on the desired moisture levels for your plants. When the sensor readings fall below this threshold, trigger the water pump to start watering. Set a maximum watering duration to prevent overwatering.
Control the Relay Module
Use digital output pins on your microcontroller to control the relay module. Send a high signal to activate the relay and turn on the water pump. Send a low signal to deactivate the relay and turn off the pump.
Add Scheduling Features
Implement scheduling features to control when the system checks moisture levels and waters the plants. Use timers or real-time clocks to schedule watering sessions at specific times of the day or week.
Test and Debug Your Code
Thoroughly test your code and debug any errors. Monitor the sensor readings and watering patterns to ensure that the system is working as intended.
With effective programming, you can tailor your smart garden to meet the unique needs of your plants and create a truly automated gardening experience.
Optimizing and Maintaining Your Smart Garden
Once your DIY smart garden is up and running, it’s important to optimize its performance and maintain it properly to ensure long-term reliability. This involves fine-tuning the watering schedule, calibrating the sensors, and performing regular maintenance tasks.
Here are some tips for optimizing and maintaining your smart garden:
Fine-Tune the Watering Schedule
Monitor your plants’ health and adjust the watering schedule accordingly. Consider factors like weather conditions, plant growth stage, and soil type when fine-tuning the watering frequency and duration.
Calibrate the Sensors Regularly
Calibrate the soil moisture sensors periodically to ensure accurate readings. Check the sensor outputs against known moisture levels and adjust the calibration factors as needed.
Clean the Emitters
Clean the emitters regularly to prevent clogging and ensure even water distribution. Use a small brush or needle to remove any debris or mineral deposits.
Inspect the Tubing and Connectors
Inspect the tubing and connectors for leaks or damage. Replace any worn or damaged components to prevent water loss and maintain system efficiency.
Monitor Power Consumption
Monitor the power consumption of your smart garden system to identify potential energy savings. Consider using low-power components and optimizing the watering schedule to minimize energy usage.
Protect the Electronics
Protect the microcontroller, sensors, and relay module from moisture and extreme temperatures. Enclose the electronics in a weatherproof enclosure to prevent damage and ensure long-term reliability.
By following these optimization and maintenance tips, you can ensure that your DIY smart garden thrives for years to come, providing you with a healthy and productive gardening experience.
| Key Point | Brief Description |
|---|---|
| 💡 Planning | Assess garden needs and design your layout. |
| 🌱 Components | Choose sensors, pump, and a Raspberry Pi or Arduino. |
| 💧 Programming | Set logic for sensor reading and water control. |
| 🛠️ Maintenance | Regularly calibrate sensors and clean components. |
Frequently Asked Questions
▼
The basic components include a microcontroller (like Raspberry Pi or Arduino), soil moisture sensors, a water pump, a relay module, tubing, connectors, and a power supply.
▼
Soil moisture sensors measure the water content in the soil. They send this data to the microcontroller, which then uses it to determine when to water the plants.
▼
Yes, if you use a microcontroller with Wi-Fi connectivity (like Raspberry Pi), you can set up remote monitoring and control via a smartphone or computer.
▼
Enclose the microcontroller, sensors, and relay module in a weatherproof enclosure to protect them from moisture and extreme temperatures, ensuring longevity.
▼
Basic programming knowledge is helpful. Arduino uses a simplified version of C++, while Raspberry Pi supports Python, which is easy to learn and widely used.
Conclusion
Building a **DIY smart garden with automated watering and monitoring for $250** is a rewarding project that combines gardening, electronics, and programming. By following these steps, you can create an efficient, sustainable, and enjoyable gardening experience, optimizing plant health and saving time and resources.


