Transform Old Tablets: DIY Smart Home Control Panel
Transform Your Old Tablet into a Powerful DIY Smart Home Control Panel
In an era dominated by smart homes and interconnected devices, the quest for a centralized, user-friendly control system is more relevant than ever. While commercial smart home hubs can be expensive, there’s a remarkably cost-effective and satisfying alternative: repurposing your old tablet into a dedicated, wall-mounted smart home control panel. This isn’t just about saving money; it’s about giving new life to forgotten tech, customizing your smart home experience, and adding a touch of futuristic elegance to your living space. This comprehensive guide will walk you through every step of transforming your dormant device into the brain of your smart home, focusing on how to create a powerful DIY Smart Home Tablet.
The beauty of this project lies in its versatility. Whether you’re an Android enthusiast or an Apple loyalist, an old tablet gathering dust in a drawer can become the command center you’ve always wanted. Imagine a beautifully integrated display on your wall, offering instant access to your lights, thermostat, security cameras, music, and more, all from a single, intuitive interface. This approach not only enhances convenience but also streamlines your smart home ecosystem, making it more accessible for everyone in your household. Let’s dive into how you can achieve this transformation and elevate your smart home game with a dedicated DIY Smart Home Tablet.
Why a DIY Smart Home Tablet is Your Next Project
Before we delve into the how-to, let’s explore the compelling reasons why turning an old tablet into a smart home control panel is an excellent idea. The advantages extend far beyond mere novelty, offering practical benefits that enhance your daily life and elevate your home’s intelligence.
Cost-Effectiveness: Reusing vs. Buying New
The most obvious benefit is financial. Dedicated smart home control panels from brands like Savant, Control4, or even more mainstream options like Google Nest Hub Max or Amazon Echo Show, can be quite pricey, especially for larger, wall-mountable displays. By utilizing an existing tablet, you’re essentially getting the hardware for free. This significantly reduces the entry barrier for a sophisticated smart home setup, allowing you to allocate your budget to other smart devices or even professional installation if needed. The concept of a DIY Smart Home Tablet thrives on this principle of smart resource utilization.
Centralized Control: A Unified Smart Home Experience
Juggling multiple apps for different smart devices can be cumbersome. One app for your lights, another for your thermostat, and yet another for your security cameras – it quickly becomes fragmented. A wall-mounted tablet acts as a central hub, consolidating all your smart home controls into one accessible interface. This creates a unified experience, simplifying the management of your connected devices and making your smart home truly intuitive. A well-configured DIY Smart Home Tablet streamlines your interactions and reduces digital clutter.
Customization and Flexibility: Tailor-Made for Your Home
Unlike off-the-shelf control panels, a repurposed tablet offers unparalleled customization. You can choose the apps, widgets, and dashboards that best suit your needs and aesthetic preferences. Want to see your energy consumption data prominently? Done. Need quick access to your favorite music streaming service? No problem. The flexibility to design your own interface ensures that your smart home control panel is perfectly tailored to your lifestyle. This personal touch is a key advantage of a DIY Smart Home Tablet.
Enhanced Aesthetics: A Modern Touch to Your Decor
A sleek tablet, flush-mounted on your wall, can add a sophisticated and modern touch to any room. It eliminates the need for multiple physical switches or remotes, contributing to a cleaner, more minimalist environment. With various mounting options and bezel designs available, you can integrate the tablet seamlessly into your home decor, turning a functional device into a design element. The visual appeal of a well-integrated DIY Smart Home Tablet is undeniable.
Extending Device Lifespan: Sustainable Tech Practices
In an age of rapid technological advancement, devices often become obsolete long before they stop functioning. Repurposing an old tablet gives it a new lease on life, reducing electronic waste and promoting sustainable tech practices. Instead of contributing to landfills, you’re transforming an underutilized gadget into a valuable asset for your home. This eco-friendly aspect adds another layer of satisfaction to building your own DIY Smart Home Tablet.
Choosing the Right Tablet: Essential Considerations
Not all old tablets are created equal when it comes to being a smart home control panel. Several factors need to be considered to ensure a smooth and effective setup. The choice of your device is paramount for a successful DIY Smart Home Tablet project.
Operating System: Android vs. iOS
- Android Tablets: Generally offer more flexibility in terms of customization, widgets, and third-party app sideloading. Many smart home dashboards and kiosk mode apps are more readily available or easier to implement on Android. You’ll likely have more control over system settings and background processes. This makes Android a popular choice for a DIY Smart Home Tablet.
- iOS Tablets (iPads): Known for their reliability and long-term software support. While less customizable than Android, iPads excel with Apple HomeKit integration and offer a polished user experience. Kiosk mode options exist, but might be more restricted to enterprise solutions or require specific app support.
For most DIYers seeking maximum flexibility, an Android tablet is often the preferred choice for a DIY Smart Home Tablet.
Performance and Age: Don’t Go Too Old
While we’re talking about old tablets, there’s a limit. A tablet that is too old might struggle with modern smart home apps, leading to slow response times and a frustrating user experience. Aim for a tablet that is no more than 5-7 years old, ideally with at least 2GB of RAM and a quad-core processor. This ensures it can comfortably run your chosen smart home dashboard and other essential applications. A responsive DIY Smart Home Tablet is key to a pleasant experience.
Screen Size and Resolution: Visibility and Usability
Consider where the tablet will be mounted and how you’ll interact with it. A screen size between 7 and 10 inches is usually ideal for visibility without being overly obtrusive. Higher resolution screens will offer a crisper display, which is important if you’ll be viewing security camera feeds or detailed dashboards. The physical dimensions and display quality are crucial for your DIY Smart Home Tablet.
Battery Health and Charging: Always On
Since your tablet will be constantly powered, battery health is less critical than its ability to handle continuous charging. However, ensure the charging port is fully functional. Some older tablets might experience battery swelling when constantly charged, so it’s wise to monitor this. Consider tablets with good power management features. A reliable power source is fundamental for your DIY Smart Home Tablet.
Connectivity: Wi-Fi and Bluetooth
Ensure the tablet has robust Wi-Fi capabilities to connect to your home network and control your smart devices. Bluetooth can also be useful for connecting to local sensors or speakers. Most modern tablets will have these, but it’s worth double-checking for older models. Seamless connectivity is the backbone of any effective DIY Smart Home Tablet.
Preparing Your Tablet for Its New Role
Once you’ve selected your tablet, it’s time to prepare it for its life as a dedicated smart home control panel. This involves a series of software and hardware adjustments to optimize its performance and ensure it’s always ready for action.
Factory Reset and Software Updates
Start with a factory reset to wipe all personal data and remove unnecessary apps. This will free up storage and improve performance. Once reset, ensure the tablet is running the latest possible version of its operating system. This provides the best security and compatibility with modern smart home apps. A clean slate is essential for your DIY Smart Home Tablet.
Disable Unnecessary Features
To prevent distractions and conserve resources, disable features you won’t need:
- Notifications: Turn off all app notifications to keep the screen clean and focused on smart home controls.
- Lock Screen: Set the tablet to automatically unlock or remove the lock screen entirely if it’s in a secure location.
- Auto-Brightness: Set brightness manually or use an app that adjusts it based on ambient light, but avoid erratic auto-brightness.
- Sleep Mode: Configure the tablet to stay awake indefinitely or only dim the screen after a long period of inactivity.
- Auto-Updates: Disable automatic app updates to avoid unexpected reboots or performance dips. Update manually when convenient.
Install Essential Smart Home Apps
This is where your smart home ecosystem comes into play. Install the apps for your specific smart devices:
- Smart Home Hub Apps: If you use a hub like SmartThings, Home Assistant, Hubitat, or Apple Home, install their respective apps.
- Individual Device Apps: For devices not integrated into a hub (e.g., specific smart bulbs, security cameras), install their standalone apps.
- Aggregator Apps: Consider apps like Google Home or Amazon Alexa if you want to control devices across different ecosystems.
The selection of these apps forms the core functionality of your DIY Smart Home Tablet.
Kiosk Mode or Dedicated Launcher
To ensure your tablet functions solely as a control panel, you’ll want to restrict access to other apps and system settings. This is achieved through:
- Kiosk Mode Apps (Android): Apps like Fully Kiosk Browser, WallPanel, or Kiosk Browser allow you to lock down the tablet to a single app or a specific set of URLs. They also offer features like motion detection to wake the screen, screen dimming, and remote administration. This is highly recommended for a dedicated DIY Smart Home Tablet.
- Guided Access (iOS): Apple’s Guided Access feature can lock an iPad to a single app, preventing users from exiting it.
- Custom Launchers (Android): Replace the default launcher with a minimalist one that only shows your smart home apps or widgets.
Utilizing a kiosk mode ensures your DIY Smart Home Tablet remains focused on its primary function.
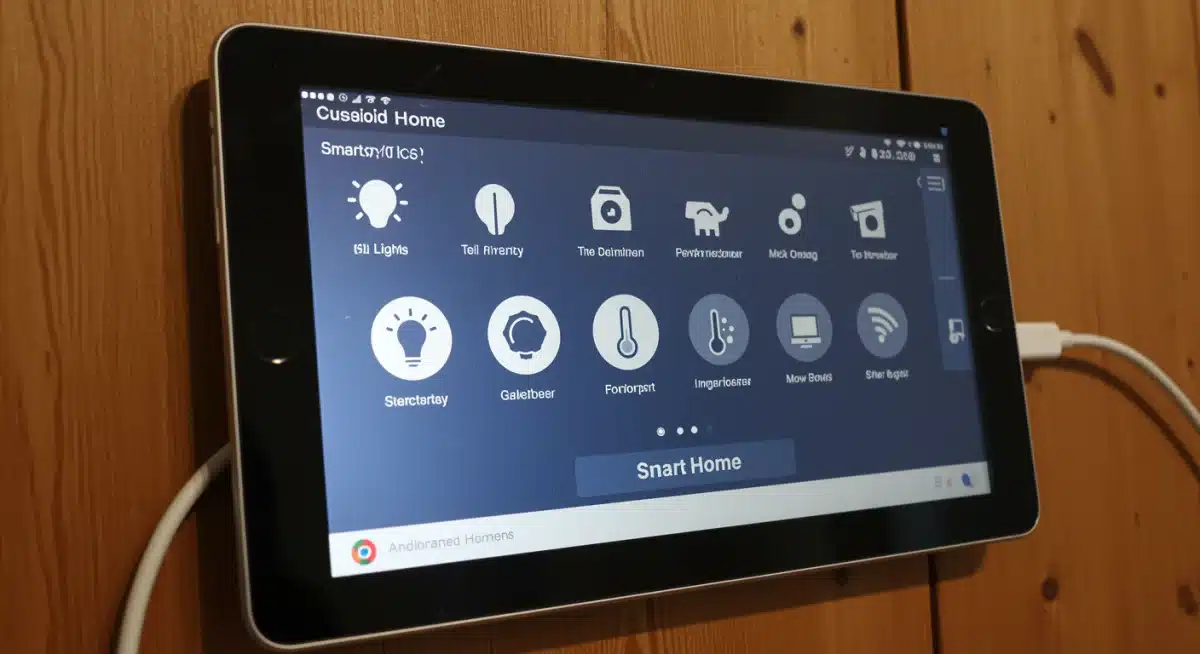
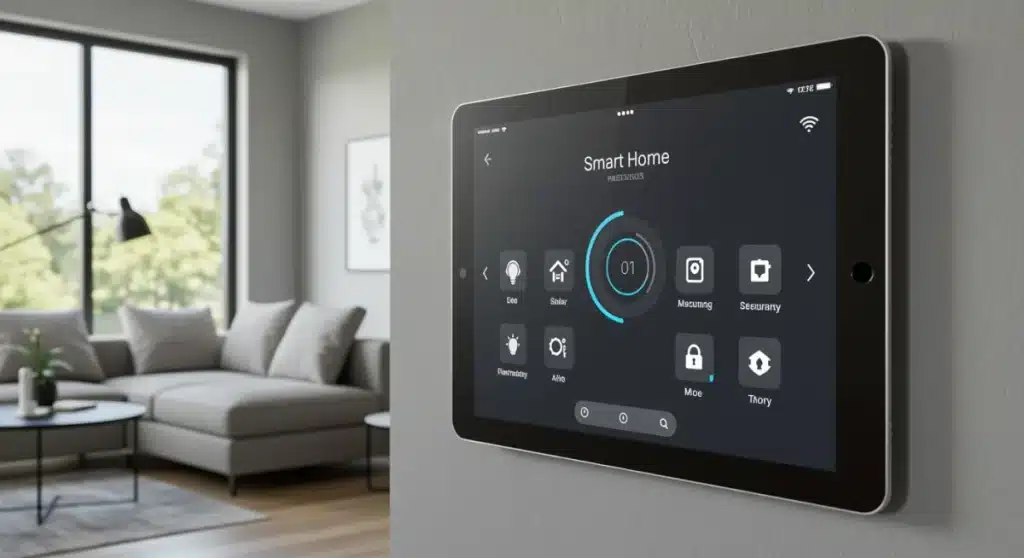
Designing Your Smart Home Dashboard
The visual interface is crucial for an effective smart home control panel. A well-designed dashboard makes interacting with your home intuitive and enjoyable. This is where your DIY Smart Home Tablet truly comes to life.
Choosing a Dashboard Solution
Several options are available, depending on your smart home ecosystem and technical comfort level:
- Home Assistant: If you’re running Home Assistant, its Lovelace UI is incredibly powerful and customizable. You can create multiple views, integrate various sensors, and design a truly bespoke experience. This is a top-tier option for a sophisticated DIY Smart Home Tablet.
- SmartThings/Hubitat Dashboards: These platforms offer built-in dashboard capabilities, allowing you to create custom layouts with tiles for your devices.
- Third-Party Dashboard Apps: Apps like ActionTiles (for SmartThings/Hubitat), HomeHabit, or even basic web dashboards can provide a clean interface. These often run within a browser, making them ideal for kiosk mode.
- Native Google Home/Amazon Alexa App: While less customizable, these apps offer a familiar interface if you’re already integrated into their ecosystems.
Key Dashboard Elements
When designing your dashboard, consider including these essential elements:
- Lighting Controls: On/off switches, dimmers, and color controls for individual lights or groups.
- Climate Control: Thermostat adjustments, fan speed, and temperature/humidity displays.
- Security Status: Arm/disarm options for alarms, door/window sensor status, and camera feeds.
- Media Control: Play/pause, volume, and selection for smart speakers or media players.
- Weather Information: Current conditions and forecast.
- Calendar/Schedule: Display upcoming events or routines.
- Quick Scenes/Routines: Buttons to trigger pre-programmed smart home scenes (e.g., ‘Good Morning’, ‘Movie Night’).
Tips for an Optimal Dashboard Layout
- Simplicity is Key: Avoid overcrowding the screen. Group related controls and use clear, intuitive icons.
- Logical Grouping: Organize controls by room, function, or frequency of use.
- Large Touch Targets: Ensure buttons and sliders are large enough for easy interaction, especially if the tablet is mounted slightly out of reach.
- Consistent Design: Use a consistent color scheme and font to create a cohesive look.
- Prioritize: Place the most frequently used controls prominently on the main screen. Less critical functions can be on secondary pages.
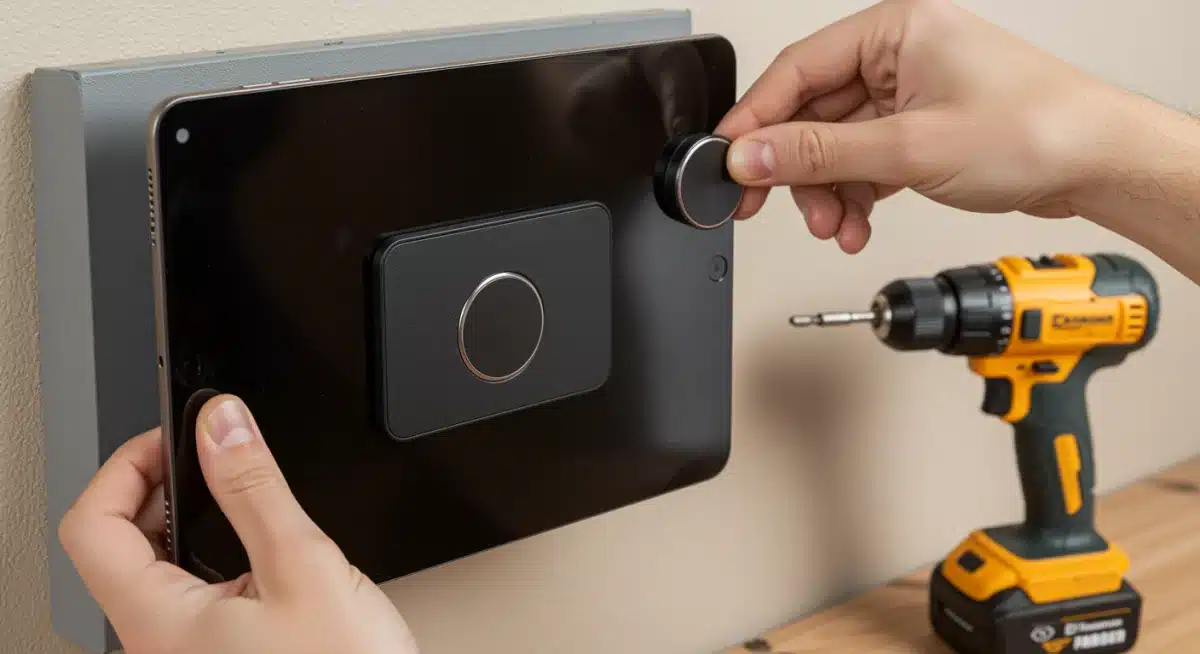
Mounting Your Tablet: Integration and Power
Once your tablet is software-ready, the next step is physically mounting it and ensuring it has continuous power. This is a critical step to make your DIY Smart Home Tablet a permanent fixture.
Choosing a Mounting Solution
There are several options, ranging from simple to integrated:
- Magnetic Wall Mounts: These are easy to install and allow for quick removal of the tablet. They typically involve an adhesive plate on the tablet and a magnetic base on the wall.
- Vesa Mounts with Tablet Adapters: If you want a more secure or adjustable mount, a VESA mount with a tablet-specific adapter can work.
- Flush Mounts/In-Wall Mounts: For a truly integrated, clean look, consider a flush mount kit. These often require cutting into your drywall and running power internally, making for a professional finish.
- Adhesive Mounts/Stands: For a less permanent solution, a heavy-duty adhesive mount or a desktop stand placed on a shelf can work, though it won’t be as seamlessly integrated.
Powering Your Tablet: Continuous Charging
This is arguably the most challenging aspect of a wall-mounted setup. Your tablet needs constant power:
- Visible Cable: The simplest solution is to run a standard USB charging cable from the tablet to a nearby outlet. While functional, this can look untidy.
- Cable Management Channels: Use adhesive cable channels to neatly hide the charging cable along the wall to an outlet.
- In-Wall Power Kit: For a clean, professional look, consider an in-wall power kit. These kits allow you to route the charging cable inside the wall to an existing power outlet, or even install a new outlet behind the tablet. This often requires basic electrical knowledge or professional help.
- PoE (Power over Ethernet) Adapters: If you have an Ethernet connection nearby and your tablet supports it (or with an adapter), PoE can deliver both power and network connectivity over a single cable, offering a very clean solution.
Ensure the charger you use provides sufficient power (at least 2A) to keep the tablet charged while the screen is on. Overcharging is generally not an issue with modern tablets, as they have built-in battery management systems. However, some users prefer smart plugs to periodically cut power to the charger, allowing the battery to cycle, though this is often unnecessary.
Advanced Customizations and Integrations
Once your basic DIY Smart Home Tablet is up and running, you can explore more advanced features to enhance its functionality and integration with your smart home.
Voice Control Integration
Many tablets have built-in voice assistants (Google Assistant, Alexa, Siri). Enable these to add a hands-free control option. You can then use voice commands directly from your wall-mounted tablet to control your smart devices, query information, or trigger routines. This adds another layer of convenience to your DIY Smart Home Tablet.
Motion Detection and Screen Activation
To save power and extend screen life, configure the tablet to only turn on its screen when someone is nearby. Many kiosk mode apps (like Fully Kiosk Browser) can utilize the tablet’s front-facing camera for motion detection. Alternatively, you can integrate with external motion sensors from your smart home system to trigger the screen activation. This makes your DIY Smart Home Tablet more energy-efficient and user-friendly.
Dedicated Sensors and Automations
Consider integrating the tablet’s own sensors into your smart home:
- Light Sensor: Use the ambient light sensor to adjust screen brightness automatically or trigger lighting scenes based on room brightness.
- Microphone: Implement sound detection for security alerts or even voice command triggers.
- Temperature/Humidity: Some tablets have these built-in, which can be reported to your smart home hub.
You can also set up automations so that when you interact with the tablet (e.g., tap a specific button), it triggers a sequence of actions in your smart home. This deep integration elevates the utility of your DIY Smart Home Tablet.
Adding Notifications and Alerts
Configure your smart home system to push critical notifications to your tablet. This could include:
- Security alerts (door opened, motion detected).
- Package delivery notifications.
- Weather warnings.
- Reminders or calendar events.
Having these alerts prominently displayed on your wall-mounted DIY Smart Home Tablet ensures you stay informed.
Integrating Media and Entertainment
Beyond smart home control, your tablet can also serve as a media hub:
- Music Player: Control your smart speakers, stream music directly, or display album art.
- Photo Frame: When idle, display a rotating slideshow of family photos.
- Video Feeds: Keep an eye on baby monitors or security cameras in real-time.
Troubleshooting Common Issues
Even with careful planning, you might encounter some hiccups. Here are common issues and their solutions for your DIY Smart Home Tablet.
Tablet Overheating or Battery Swelling
Constant charging can sometimes lead to overheating, especially with older tablets or poor-quality chargers. If you notice swelling of the tablet’s back or excessive heat, immediately unplug it. Solutions include:
- Using a high-quality, reputable charger.
- Ensuring adequate ventilation if the tablet is flush-mounted.
- Implementing a smart plug to cycle charging (e.g., charge to 80%, then let it drain to 20% before recharging).
- Replacing the battery if it’s old and degraded.
Wi-Fi Connectivity Issues
A weak Wi-Fi signal can lead to slow response times or dropped connections. Ensure your tablet is within good range of your router or a Wi-Fi extender. Consider setting a static IP address for the tablet to prevent connection drops. A stable connection is vital for your DIY Smart Home Tablet.
App Crashes or Slow Performance
If apps are crashing or the tablet feels sluggish, try the following:
- Clear the cache of problematic apps.
- Ensure all unnecessary background apps are closed or uninstalled.
- Perform a factory reset again if performance severely degrades.
- Consider a more lightweight dashboard solution or fewer complex widgets.
Screen Burn-in (OLED Screens)
If your tablet has an OLED screen, constant display of static elements (like a dashboard) can lead to burn-in. Mitigate this by:
- Using screen dimming or turning the screen off when not in use.
- Periodically shifting elements on the dashboard slightly.
- Using a screensaver that rotates content (e.g., a photo gallery).
The Future of Your DIY Smart Home Tablet
The world of smart home technology is constantly evolving, and your DIY Smart Home Tablet can evolve with it. As new integrations and features become available, you’ll have the flexibility to update your dashboard and expand its capabilities. This project isn’t a one-time setup; it’s a living system that can adapt to your changing needs and technological advancements.
Community and Resources
Don’t hesitate to tap into the vast online communities dedicated to smart home DIY, Home Assistant, SmartThings, and tablet repurposing. Forums like Reddit’s r/smarthome, r/homeassistant, and various tech blogs are treasure troves of information, tips, and inspiration. Learning from others’ experiences can save you time and introduce you to innovative solutions for your DIY Smart Home Tablet.
Continuous Improvement
Regularly review your dashboard and its functionality. Are there controls you rarely use? Can you optimize the layout for better accessibility? Is there a new smart device you want to integrate? Treat your DIY Smart Home Tablet as an ongoing project, and you’ll continually refine your smart home experience.
Conclusion: Empowering Your Smart Home with a Repurposed Tablet
Repurposing an old tablet into a wall-mounted smart home control panel is an incredibly rewarding and cost-effective DIY project. It transforms a forgotten piece of technology into a central, intuitive hub for your entire smart home ecosystem. From the initial tablet selection and software preparation to designing a personalized dashboard and ensuring seamless power integration, every step contributes to a smarter, more efficient, and aesthetically pleasing home. By embracing the concept of a DIY Smart Home Tablet, you not only save money but also gain unparalleled customization and a deeper understanding of your home’s technology.
This project empowers you to take control of your smart home experience, moving beyond fragmented apps and generic interfaces. It’s an investment in convenience, sustainability, and the joy of creating something truly tailored to your needs. So, dust off that old tablet, follow these steps, and unlock the full potential of your connected living space. Your future self, enjoying seamless smart home control, will thank you.


