Build Your Own Smart Home Hub: Open-Source Guide Under $150
Building an open-source smart home hub under $150 empowers users with complete control over their home automation, offering privacy, flexibility, and significant cost savings compared to proprietary systems.
Are you ready to take control of your home automation, enhance your privacy, and save money while doing it? This expert guide will show you how to Build Your Own Smart Home Hub: An Expert Guide to Open-Source Platforms for Under $150, transforming your living space into a truly intelligent environment tailored to your needs.
The allure of open-source smart home hubs
The world of smart home technology often presents a dilemma: convenience versus control. Proprietary systems offer ease of use but lock you into specific ecosystems, often with subscription fees and limited customization. Open-source solutions, however, provide a compelling alternative, offering unparalleled flexibility and ownership over your home’s data and automation.
Choosing an open-source smart home hub means freedom from vendor lock-in and the ability to integrate devices from various manufacturers. This approach not only enhances compatibility but also fosters a vibrant community of developers and users, constantly improving the platforms and offering innovative solutions.
Why open-source?
The benefits of an open-source smart home are numerous, extending beyond just cost savings. It’s about empowerment and creating a system that truly works for you.
- Unmatched Customization: Tailor every aspect of your smart home, from device integrations to complex automation routines.
- Enhanced Privacy and Security: Keep your data local and avoid reliance on cloud services that might compromise your personal information.
- No Subscription Fees: Once you set it up, there are no ongoing costs for basic functionality.
- Community Support: Access a global network of enthusiasts and experts ready to assist with troubleshooting and development.
Embracing an open-source smart home hub is a strategic move for anyone seeking a robust, future-proof, and highly personalized home automation experience. It’s an investment in your control and privacy, offering a pathway to a truly intelligent living space without breaking the bank.
Essential hardware for your DIY smart home hub
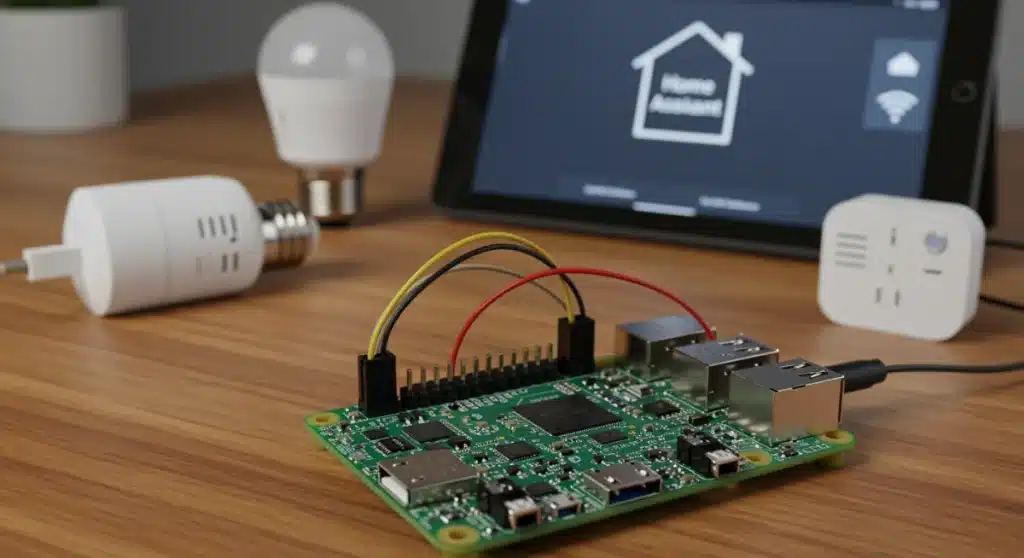
Building a smart home hub from scratch might sound daunting, but the hardware requirements are surprisingly modest and budget-friendly. The core of most open-source hubs is a small, powerful single-board computer (SBC), with the Raspberry Pi being the most popular choice due to its versatility and community support. Understanding the components needed is the first step toward a successful setup.
Beyond the SBC, you’ll need a reliable power supply, a fast microSD card for the operating system, and a case to protect your new hub. Depending on your chosen platform and the devices you plan to integrate, you might also consider additional communication modules for Zigbee, Z-Wave, or other protocols. These components are readily available and can be acquired without exceeding our $150 budget.
Choosing your single-board computer
The Raspberry Pi 4 Model B is often the go-to choice for smart home enthusiasts. Its robust performance and various connectivity options make it ideal for running demanding smart home software.
- Raspberry Pi 4 Model B (2GB or 4GB RAM): Offers excellent performance for Home Assistant or OpenHAB.
- Alternative SBCs: Consider Orange Pi or ASUS Tinker Board for similar capabilities, often at competitive prices.
- Power Supply: A high-quality 5V, 3A USB-C power supply is crucial for stable operation.
- MicroSD Card: A 32GB or 64GB high-speed (Class 10 or U3) microSD card is recommended for system longevity and performance.
Carefully selecting your hardware components ensures a stable and efficient foundation for your open-source smart home hub. Prioritizing quality for the SBC and microSD card will prevent future headaches and provide a smoother user experience.
Exploring leading open-source platforms: Home Assistant vs. OpenHAB
With your hardware in place, the next crucial decision is selecting the right open-source software platform. Two giants dominate this space: Home Assistant and OpenHAB. Both offer robust features, extensive device compatibility, and active communities, but they approach smart home automation with slightly different philosophies.
Home Assistant is known for its user-friendly interface and rapid development, making it accessible to both beginners and advanced users. OpenHAB, on the other hand, provides a more modular and highly configurable framework, appealing to those who prefer granular control and extensive customization options. Understanding their core differences will help you choose the platform that best aligns with your technical comfort level and automation goals.
Home Assistant: user-friendly power
Home Assistant prides itself on ease of use and a vast array of integrations. Its active community ensures constant updates and support for new devices.
- YAML Configuration: Offers a balance of graphical interface and text-based configuration for advanced users.
- Add-on Store: Simplifies installation of extra functionalities like Zigbee2MQTT, Node-RED, and more.
- Lovelace UI: Highly customizable dashboard for visualizing and controlling your smart home.
- Automations: Powerful and flexible automation engine with visual and YAML-based options.
Home Assistant is an excellent starting point for most DIY enthusiasts due to its comprehensive features and relatively low learning curve, allowing you to quickly get your smart home up and running.
OpenHAB: modular and flexible
OpenHAB provides a highly extensible framework, giving users deep control over every aspect of their smart home. It’s often preferred by those with programming experience or a desire for ultimate customization.
- Text-based Configuration: Primarily uses text files for defining items, rules, and sitemaps, offering fine-grained control.
- Binding Architecture: Supports a wide range of devices through its extensive binding library.
- Rules Engine: Powerful rule creation with various scripting languages (DSL, JavaScript, Python).
- UIs: Offers several user interfaces, including Main UI, Basic UI, and HABPanel, catering to different preferences.
While OpenHAB might have a steeper learning curve, its modular design and powerful scripting capabilities make it an ideal choice for users who want to build a truly unique and sophisticated smart home system. Both platforms offer excellent documentation and vibrant communities, ensuring you’ll find plenty of resources to guide you.
Step-by-step setup: from installation to basic automation
Once you’ve gathered your hardware and chosen your open-source platform, the real fun begins: setting up your smart home hub. This process involves flashing the operating system, installing the smart home software, and configuring your first devices and automations. While the specifics vary slightly between Home Assistant and OpenHAB, the general workflow remains consistent, guiding you toward a functional smart home.
The initial setup might seem complex, but by following clear instructions and leveraging community resources, you’ll find it manageable. The goal is to create a stable foundation that allows for future expansion and increasingly complex automation scenarios. Remember to backup your configurations regularly to prevent data loss.
Installing Home Assistant OS on Raspberry Pi
The easiest way to get started with Home Assistant is by using Home Assistant OS, a dedicated operating system optimized for SBCs like the Raspberry Pi.
- Download Home Assistant OS: Visit the official Home Assistant website and download the correct image for your Raspberry Pi model.
- Flash SD Card: Use a tool like Balena Etcher to flash the downloaded image onto your microSD card.
- Boot the Pi: Insert the microSD card into your Raspberry Pi, connect an Ethernet cable, and power it on.
- Initial Setup: Access Home Assistant via your web browser (usually http://homeassistant.local:8123) and follow the on-screen instructions to create your user account and complete the initial configuration.
After the initial setup, Home Assistant will automatically discover many of your network-connected smart devices, making the integration process remarkably smooth. You can then begin adding devices manually and exploring the automation engine.
Configuring your first devices and automations
Adding devices and creating automations are the core functions of your smart home hub. Start with simple devices and routines to familiarize yourself with the platform.
- Adding Devices: Use the integrations page in Home Assistant to add devices like smart bulbs, switches, or sensors. Many integrations are automatically discovered.
- Creating Simple Automations: Begin with basic automations, such as turning on a light when motion is detected or setting a schedule for your smart plugs.
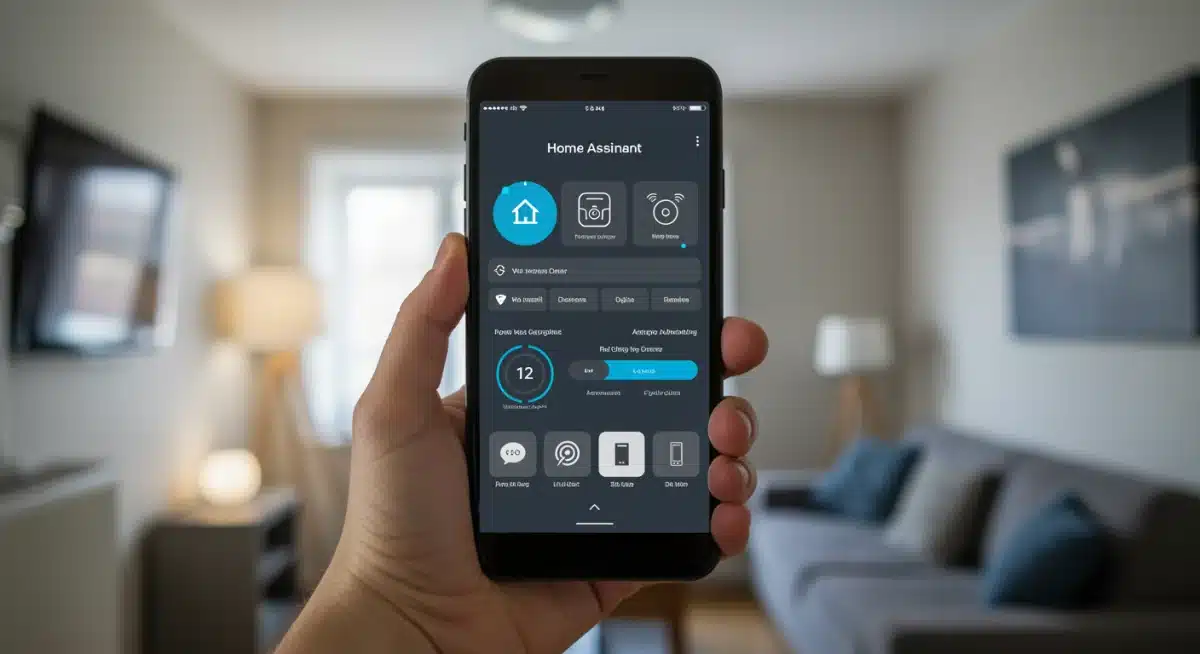
- Exploring Dashboards: Customize your Lovelace dashboard to display relevant information and controls for your devices.
This hands-on approach will help you understand the capabilities of your chosen platform and how to leverage its features to create a truly personalized smart home experience. Don’t hesitate to experiment with different automations to see what works best for your lifestyle.
Integrating devices: Zigbee, Z-Wave, Wi-Fi, and beyond
A true smart home hub excels at integrating a diverse range of devices, regardless of their underlying communication protocol. Open-source platforms like Home Assistant and OpenHAB are particularly adept at this, allowing you to bridge the gaps between different ecosystems. Understanding the common protocols and how to incorporate them into your hub is key to building a comprehensive and versatile smart home.
Most smart home devices communicate using Zigbee, Z-Wave, or Wi-Fi. While Wi-Fi devices often connect directly to your network, Zigbee and Z-Wave require a dedicated USB dongle connected to your Raspberry Pi. These dongles act as coordinators, translating the protocol’s signals into something your hub can understand, thereby expanding your device compatibility significantly.
Adding Zigbee and Z-Wave devices
These low-power mesh networks are popular for sensors, lights, and switches due to their reliability and efficiency.
- USB Dongles: Purchase a compatible Zigbee (e.g., ConBee II, Sonoff Zigbee 3.0 USB Dongle Plus) or Z-Wave (e.g., Aeotec Z-Stick) USB dongle.
- Software Integration: Install the appropriate integration or add-on in your smart home platform (e.g., ZHA or Zigbee2MQTT for Zigbee, Z-Wave JS for Z-Wave in Home Assistant).
- Pairing Devices: Follow the platform’s instructions to put your devices into pairing mode and add them to your network.
By investing in these dongles, you unlock a vast ecosystem of devices, many of which are more affordable and energy-efficient than their Wi-Fi counterparts. This broadens your options for automation and device control, enhancing the overall intelligence of your home.
Integrating Wi-Fi and cloud-based devices
Many smart devices, especially those from major brands, rely on Wi-Fi and often connect to cloud services. Open-source hubs can still integrate these, often through local APIs or official integrations.
- Local Integrations: Prioritize devices that offer local control (e.g., Philips Hue Bridge, Shelly devices) to reduce reliance on the cloud.
- Cloud Integrations: For devices without local control, use official integrations provided by your smart home platform (e.g., Tuya, SmartThings, Google Home).
- MQTT: For custom DIY Wi-Fi devices, MQTT (Message Queuing Telemetry Transport) is an excellent protocol for light-weight communication.
The beauty of an open-source hub lies in its ability to centralize control over all these disparate devices, creating a unified interface and allowing them to interact in ways their original manufacturers never intended. This truly transforms your collection of smart gadgets into a cohesive and intelligent system.
Advanced automation and customization
Once your basic devices are integrated, the true power of an open-source smart home hub becomes apparent through advanced automation and deep customization. This is where you move beyond simple on/off commands and create intelligent routines that react to your environment, habits, and preferences. Leveraging the full potential of your chosen platform allows for a truly personalized and proactive smart home experience.
Advanced automation involves creating complex sequences of actions triggered by various conditions, such as time of day, sensor readings, or even external data like weather forecasts. Customization extends to building personalized dashboards, writing custom scripts, and integrating third-party services to enhance functionality. This level of control is a hallmark of open-source systems, setting them apart from simpler, proprietary solutions.
Crafting complex routines with Node-RED
Node-RED is a flow-based programming tool that integrates seamlessly with Home Assistant and OpenHAB, offering a visual way to create sophisticated automations.
- Visual Programming: Drag and drop nodes to create complex logic flows without writing extensive code.
- Contextual Triggers: Combine multiple conditions (e.g., time, motion, light levels) to trigger actions.
- Integrate External Data: Pull in weather data, calendar events, or public APIs to influence automations.
- Error Handling: Design robust flows that can handle unexpected device states or network issues.
Using Node-RED can significantly simplify the creation of intricate automations, making your smart home react intelligently to a wide range of scenarios, from dynamic lighting scenes to energy-saving routines based on occupancy and daylight.
Personalizing your dashboard and voice control
A well-designed dashboard provides an intuitive interface for controlling and monitoring your smart home. Integrating voice assistants adds another layer of convenience.
- Custom Dashboards: Design unique dashboards in Home Assistant’s Lovelace or OpenHAB’s HABPanel, organizing devices and information logically.
- Voice Assistant Integration: Connect your hub to Google Assistant or Amazon Alexa for voice control, often through a local integration to maintain privacy.
- Custom Scripts: Write Python scripts or shell commands to perform specific tasks or integrate unsupported devices.
These advanced customization options ensure that your smart home not only functions efficiently but also feels uniquely yours, reflecting your personal style and meeting your specific needs. The ability to continually refine and expand your system is a key advantage of the open-source approach.
Maintaining and securing your open-source hub
Building an open-source smart home hub is an ongoing journey that requires regular maintenance and a strong focus on security. Unlike proprietary systems that handle updates and security patches automatically, you are responsible for keeping your open-source setup robust and protected. Neglecting these aspects can lead to vulnerabilities or system instability, undermining the benefits of your DIY approach.
Regular updates ensure you benefit from the latest features, bug fixes, and security enhancements. Security involves protecting your network, your hub, and your data from unauthorized access. By adopting good practices, you can ensure your smart home remains resilient, private, and continually evolving to meet your needs.
Regular updates and backups
Keeping your software up-to-date and having reliable backups are fundamental for a healthy smart home system.
- Platform Updates: Regularly update Home Assistant or OpenHAB to the latest stable version to gain new features and security patches.
- Operating System Updates: Keep your Raspberry Pi’s operating system (e.g., Debian, Alpine Linux) updated.
- Automated Backups: Configure automatic backups of your entire system (e.g., using the Home Assistant Google Drive Backup add-on) to a secure location.
- Manual Backups: Periodically create full image backups of your microSD card for disaster recovery.
These practices are crucial for maintaining system health and providing peace of mind, knowing that your configurations and data are safe in case of unforeseen issues.
Enhancing security and privacy
Protecting your smart home from external threats and ensuring your data remains private is paramount.
- Strong Passwords: Use unique, complex passwords for your hub and all integrated services.
- Network Segmentation: Consider setting up a separate VLAN for your smart home devices to isolate them from your main network.
- Firewall Configuration: Ensure your router’s firewall is properly configured to block unwanted incoming connections.
- Local Control Preference: Prioritize devices and integrations that offer local control over cloud-dependent solutions to minimize data exposure.
- VPN for Remote Access: If you need remote access, use a secure VPN connection instead of opening ports directly to the internet.
By diligently managing updates and proactively addressing security concerns, you can safeguard your open-source smart home hub, ensuring it remains a private, reliable, and powerful asset for years to come.
| Key Point | Brief Description |
|---|---|
| Cost-Effective DIY | Build a powerful smart home hub for under $150 using open-source software and affordable hardware. |
| Open-Source Platforms | Choose between Home Assistant (user-friendly) or OpenHAB (highly customizable) for your hub’s software. |
| Hardware Essentials | A Raspberry Pi 4, power supply, and microSD card form the core components of your DIY hub. |
| Device Integration | Integrate Zigbee, Z-Wave, and Wi-Fi devices using USB dongles and software integrations for comprehensive control. |
Frequently asked questions about DIY smart home hubs
Yes, absolutely. By using affordable components like a Raspberry Pi and free open-source software, you can build a highly capable hub for under $150. Proprietary hubs often cost more upfront and may include recurring subscription fees, making the DIY approach significantly more economical in the long run.
While some basic technical familiarity with computers and networks is helpful, extensive programming knowledge is not strictly necessary. Platforms like Home Assistant offer user-friendly interfaces and clear documentation. The community support is also excellent, helping beginners through the setup process and beyond.
Open-source hubs boast broad compatibility. Most Wi-Fi, Zigbee, and Z-Wave devices can be integrated, often requiring a compatible USB dongle for Zigbee/Z-Wave. While some niche or cloud-dependent devices might be challenging, the vast majority of popular smart home gadgets are supported directly or via community-developed integrations.
Open-source hubs can be highly secure, often more so than commercial alternatives, because you control the data locally and aren’t reliant on third-party cloud servers. However, security relies on proper configuration, regular updates, strong passwords, and network best practices. The transparency of open-source code also allows for community scrutiny, often leading to quicker identification and patching of vulnerabilities.
Both Home Assistant and OpenHAB have incredibly active and supportive communities. There are extensive online forums, subreddits, documentation, and YouTube tutorials available. You’ll find a wealth of resources and experienced users eager to help troubleshoot issues or guide you through complex configurations, ensuring you’re never alone in your DIY journey.
Conclusion
Building your own open-source smart home hub for under $150 is more than just a cost-saving endeavor; it’s an empowering journey into true home automation. By choosing platforms like Home Assistant or OpenHAB, you gain unparalleled control over your devices, enhance your privacy, and unlock a world of customization possibilities that proprietary systems simply cannot match. While it requires a bit of initial effort, the rewards of a perfectly tailored, secure, and future-proof smart home are immense. Embrace the DIY spirit, leverage the power of open-source communities, and transform your living space into an intelligent environment that truly serves your needs.


