DIY Smart Home Sensors: Install 4 Leak Detectors & Get Alerts in Under 30 Mins
Water damage is a homeowner’s nightmare. From burst pipes to leaky appliances, the potential for destruction and costly repairs is immense. But what if you could detect a leak the moment it starts, no matter where you are? This is where DIY smart leak sensors come into play. In this comprehensive guide, we’ll walk you through the simple process of installing four smart leak detectors in your home and setting up instant alerts, all in under 30 minutes. Get ready to transform your home’s protection with minimal effort and maximum peace of mind.
The Hidden Threat of Water Leaks and Why You Need DIY Smart Leak Sensors
Think about the most vulnerable spots in your home: under the kitchen sink, near the water heater in the basement, behind the washing machine, or even in the bathroom. These are common culprits for hidden leaks that can go unnoticed for days, weeks, or even months. By the time you spot the discoloration on your ceiling or the dampness in your carpet, significant damage has often already occurred. The average cost of water damage claims can run into thousands of dollars, not to mention the disruption and stress of repairs.
Traditional leak detection methods often rely on visual inspection or the unfortunate discovery of a major flood. However, with the advent of smart home technology, proactive prevention is now easily accessible. DIY smart leak sensors offer an intelligent, affordable, and incredibly effective solution. These small, unobtrusive devices use advanced technology to detect even the slightest presence of water, immediately sending an alert to your smartphone, wherever you are. This early warning system can be the difference between a minor inconvenience and a catastrophic household disaster.
Embracing DIY smart leak sensors means taking control of your home’s safety. It’s about empowering yourself with real-time information and the ability to act swiftly. Imagine being on vacation and receiving an alert that your water heater is leaking. You can immediately contact a neighbor or a plumber, preventing extensive damage that would otherwise occur. This article will focus on making this advanced protection accessible to everyone, demonstrating just how quick and easy it is to set up these vital guardians for your home.
Choosing the Right DIY Smart Leak Sensors for Your Home
Before diving into the installation, selecting the right DIY smart leak sensors is crucial. The market offers a variety of options, each with slightly different features and connectivity methods. Understanding these differences will help you make an informed decision that best suits your home’s existing smart ecosystem and your personal preferences.
Connectivity Options: Wi-Fi, Zigbee, Z-Wave
- Wi-Fi Sensors: These are often the easiest to set up as they connect directly to your home’s existing Wi-Fi network. They don’t require a separate hub, which can simplify the initial installation process. However, they can sometimes consume more battery power and might be more susceptible to network congestion if you have many Wi-Fi devices.
- Zigbee/Z-Wave Sensors: These sensors communicate via a low-power wireless mesh network and typically require a dedicated smart home hub (e.g., SmartThings, Hubitat, or Amazon Echo with a built-in hub). While they add an extra piece of hardware, they offer excellent battery life, a more robust and scalable network for multiple devices, and often better range through their mesh capabilities. If you already have a smart home hub, these are often a superior choice.
Key Features to Look For:
- Battery Life: Look for sensors with long-lasting batteries (1-3 years is common) to minimize maintenance. Some even have low-battery alerts.
- Alert Mechanisms: Ensure the sensors provide instant smartphone notifications (push notifications), and some might also include audible alarms on the device itself, which is useful if you’re home.
- Durability and Design: Water sensors should be robust and designed to withstand damp environments. Compact designs are often preferred for discrete placement.
- Integration with Smart Home Ecosystems: Check if the sensors are compatible with your existing smart home platform (Google Home, Amazon Alexa, Apple HomeKit, SmartThings, etc.) for centralized control and automation.
- Temperature/Humidity Sensing: Some advanced sensors include additional environmental monitoring, which can be useful for preventing pipe freezes or monitoring basement conditions.
For this guide, we’ll assume you’ve chosen DIY smart leak sensors that are relatively easy to integrate, such as Wi-Fi enabled sensors or those compatible with a popular smart home hub. Brands like Aqara, Govee, Flo by Moen, or even general-purpose Zigbee/Z-Wave sensors are excellent choices. Aim for a kit or individual sensors that come with clear instructions and a user-friendly app.
Preparation is Key: What You’ll Need for Your DIY Smart Leak Sensor Installation
One of the beauties of installing DIY smart leak sensors is the minimal tool requirement. Most of what you need will likely be found in your home already. Gathering these items beforehand will streamline the installation process, ensuring you can indeed get all four sensors up and running in under 30 minutes.
Essential Items:
- Your Chosen Smart Leak Sensors (4 units): Make sure they are fully charged or have fresh batteries installed.
- Smartphone or Tablet: This will be used to download the sensor’s companion app and receive alerts.
- Home Wi-Fi Network Access: Ensure you have your Wi-Fi password handy if your sensors connect directly to Wi-Fi. If using a hub, ensure the hub is already set up and connected to your network.
- Small Screwdriver (Optional): Some sensors might require this to open the battery compartment.
- Cleaning Wipes or Cloth: To clean the surfaces where sensors will be placed, ensuring proper contact and preventing false readings from dirt or dust.
- Marker or Label Maker (Optional but Recommended): To label your sensors for easy identification in your app (e.g., ‘Kitchen Sink’, ‘Water Heater’).
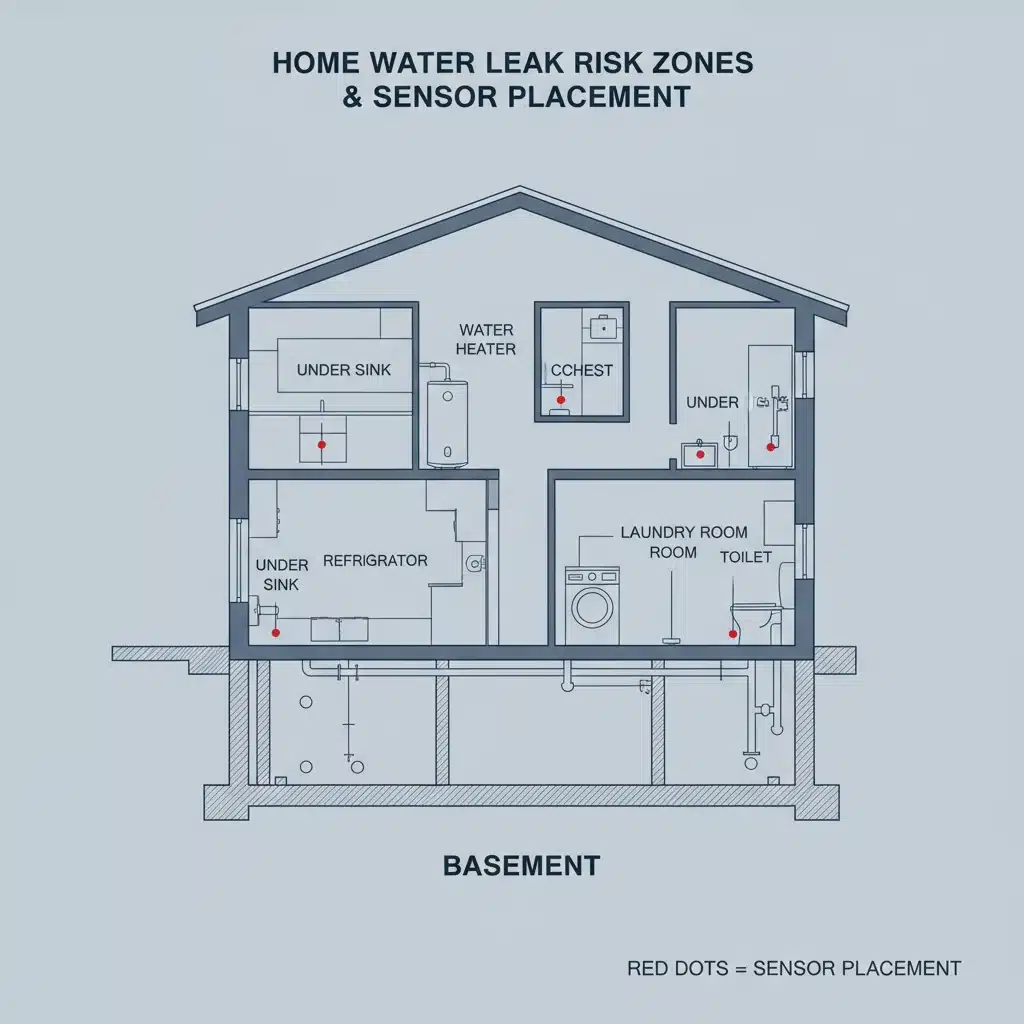
Identifying Prime Placement Areas (Strategic Thinking Before You Place):
While we’re aiming for speed, a quick mental scan of your home’s vulnerable spots will save you time and maximize protection. Consider these common areas:
- Under Sinks: Kitchen and bathroom sinks are prime locations for slow, insidious leaks from pipes or drain connections.
- Near Water Heater: A failing water heater can dump dozens of gallons of water in a short period.
- Behind/Under Washing Machine: Hoses can burst, or the machine itself can leak.
- Dishwasher Area: Leaks can occur from the supply line or the machine’s internal components.
- Refrigerator with Ice Maker/Water Dispenser: The water line connection is a common leak point.
- Basement/Crawl Space: Especially in areas prone to dampness or where pipes run.
- Near Toilets: Leaks from the tank or supply line can cause significant damage.
- Under Bathtubs/Showers: If accessible, these are critical points, though often harder to access for sensor placement.
For this 30-minute challenge, focus on the most accessible and high-risk areas. For example: kitchen sink, main bathroom sink, water heater, and washing machine. Having these four locations pre-chosen will make the physical installation much faster.
Step-by-Step Installation of Your DIY Smart Leak Sensors (Under 30 Minutes!)
Now for the main event! Follow these steps to install your four DIY smart leak sensors quickly and efficiently. We’ll break it down into manageable chunks to ensure you hit that 30-minute target.
Phase 1: Initial Setup and App Configuration (Approx. 5-7 minutes)
- Download the App: On your smartphone, search for and download the companion app for your chosen smart leak sensors. Create an account if required.
- Power On Sensors: Insert batteries or ensure your sensors are powered on and in pairing mode (refer to your sensor’s manual for specific instructions – often a button press or pull tab).
- Add First Sensor to App: Open the app and follow the on-screen prompts to ‘add new device’ or ‘add sensor’. The app will guide you through connecting the first sensor to your Wi-Fi network or smart home hub. This usually involves selecting your network and entering your password.
- Name Your Sensor: Immediately name this first sensor clearly, e.g., ‘Kitchen Sink Sensor’. This is vital for quick identification when an alert comes in.
- Repeat for Remaining Sensors: Repeat the pairing process for the other three sensors, naming each one according to its intended location (e.g., ‘Water Heater Sensor’, ‘Washing Machine Sensor’, ‘Bathroom Sink Sensor’). Modern apps are designed for quick successive pairing.
Pro Tip: Place all four sensors near your Wi-Fi router or smart home hub during the initial pairing process to ensure a strong connection. You can move them to their permanent locations after they’ve been successfully added to the app.
Phase 2: Strategic Placement (Approx. 15-20 minutes)
With your sensors paired and named, it’s time to put them in their designated spots. Remember those four high-risk areas you identified earlier? Let’s go!
- Kitchen Sink: Place the ‘Kitchen Sink Sensor’ directly on the cabinet floor, as close to the back wall and plumbing as possible, but in a spot where it won’t be easily bumped or moved. Ensure the water-sensing probes are in direct contact with the surface.
- Water Heater: Position the ‘Water Heater Sensor’ on the floor around the base of your water heater. If your water heater is in a pan, place the sensor inside the pan. The goal is for it to detect water as soon as it pools.
- Washing Machine: Slide the ‘Washing Machine Sensor’ under or behind your washing machine, as close to the water supply lines or drain hose as possible. Ensure it’s not directly in the path of vibrations from the machine, which could dislodge it.
- Bathroom Sink/Toilet: For the ‘Bathroom Sink Sensor’, place it on the floor of the vanity cabinet. Alternatively, if you chose the toilet as a high-risk area, place it discreetly behind the toilet, near the base or water supply line.
Important: Ensure the sensors are placed on a flat, stable surface where their water-sensing contacts can easily come into contact with any pooling water. Avoid placing them on absorbent materials like rugs, which could delay detection.
Phase 3: Testing and Alert Configuration (Approx. 3-5 minutes)
The final, crucial step is to test your DIY smart leak sensors to ensure they’re working correctly and that you’ll receive alerts.
- Simulate a Leak (Carefully!): Take a small amount of water (a few drops from a spoon or a damp paper towel) and gently touch it to the sensing probes of each installed sensor, one by one.
- Verify Alerts: Immediately check your smartphone. You should receive a push notification from the app, indicating which sensor detected water (e.g., ‘Water detected at Kitchen Sink!’). Some sensors also have an audible alarm.
- Clear the Water: After testing, gently wipe the sensors dry with a cloth. The app should then show a ‘no water detected’ status.
- Configure Notifications: In the app settings, ensure that push notifications are enabled for water detection. You might also have options to configure email alerts, SMS alerts (if supported by your sensor/service), or even integrate with other smart home routines (e.g., flash lights, sound an alarm).
Congratulations! You’ve successfully installed four DIY smart leak sensors and configured your alerts, all likely within the 30-minute timeframe. You’ve just added a significant layer of protection to your home against one of its most destructive threats.
Maximizing Protection: Advanced Tips for Your DIY Smart Leak Sensors
While the basic setup of your DIY smart leak sensors provides immediate benefits, there are several ways to enhance their effectiveness and integrate them deeper into your smart home ecosystem. These advanced tips can further reduce risk and streamline your home management.
Expand Your Coverage: More Sensors, More Protection
Once you’ve seen how easy it is to install the initial four, consider expanding your coverage. Additional areas that benefit from smart leak detection include:
- Water Softener/Filter: Connections can fail.
- HVAC Condensate Pan: Clogs can cause overflows.
- Sump Pump Pit: If your sump pump fails, you’ll want to know immediately.
- Attic (near water tanks or AC units): Leaks here can quickly affect ceilings.
- Vacation Homes/Rental Properties: Essential for remote monitoring.
The more sensors you deploy in vulnerable areas, the more comprehensive your home’s water damage prevention strategy becomes. Remember to name each sensor clearly in your app for easy identification.
Integrate with Smart Home Automations
The true power of DIY smart leak sensors shines when integrated with other smart home devices. Most modern sensors and hubs allow for custom automations:
- Shut Off Main Water Valve: The ultimate protection! Pair your leak sensors with a smart water shut-off valve (e.g., Flo by Moen, LeakSmart). If a leak is detected, the automation can automatically close your main water supply, preventing further damage. This is a higher-investment but incredibly powerful solution.
- Lights and Sirens: If a leak is detected while you’re home, you can configure smart lights to flash red or a smart siren to sound, drawing immediate attention to the problem.
- Send Alerts to Others: Some apps allow you to add multiple contacts to receive alerts, ensuring someone is always notified, even if you miss a notification.
- Camera Integration: If you have a smart camera in the vicinity of a leak, an automation could trigger the camera to record or send a snapshot when water is detected, helping you assess the situation remotely.
Regular Maintenance and Battery Checks
Even the best DIY smart leak sensors require minimal maintenance to ensure continuous operation:
- Battery Monitoring: Most smart home apps will display the battery level of your sensors. Pay attention to low-battery alerts and replace batteries promptly.
- Periodic Testing: Once every few months, repeat the testing process (Phase 3) for each sensor. This confirms they are still connected and functioning correctly.
- Clean Sensor Probes: Dust or grime can accumulate on the sensing probes over time. Gently wipe them clean to ensure accurate readings.
- Check Network Connectivity: If a sensor goes offline, check its battery and your Wi-Fi or hub connection.
By following these advanced tips, you can transform your simple leak detection system into a robust, integrated home protection network, providing unparalleled peace of mind.
Understanding and Responding to Leak Alerts from Your DIY Smart Leak Sensors
The primary purpose of your DIY smart leak sensors is to provide timely alerts. Knowing how to interpret these alerts and what steps to take is just as important as the installation itself. A quick and informed response can significantly reduce potential damage.
Interpreting Notifications
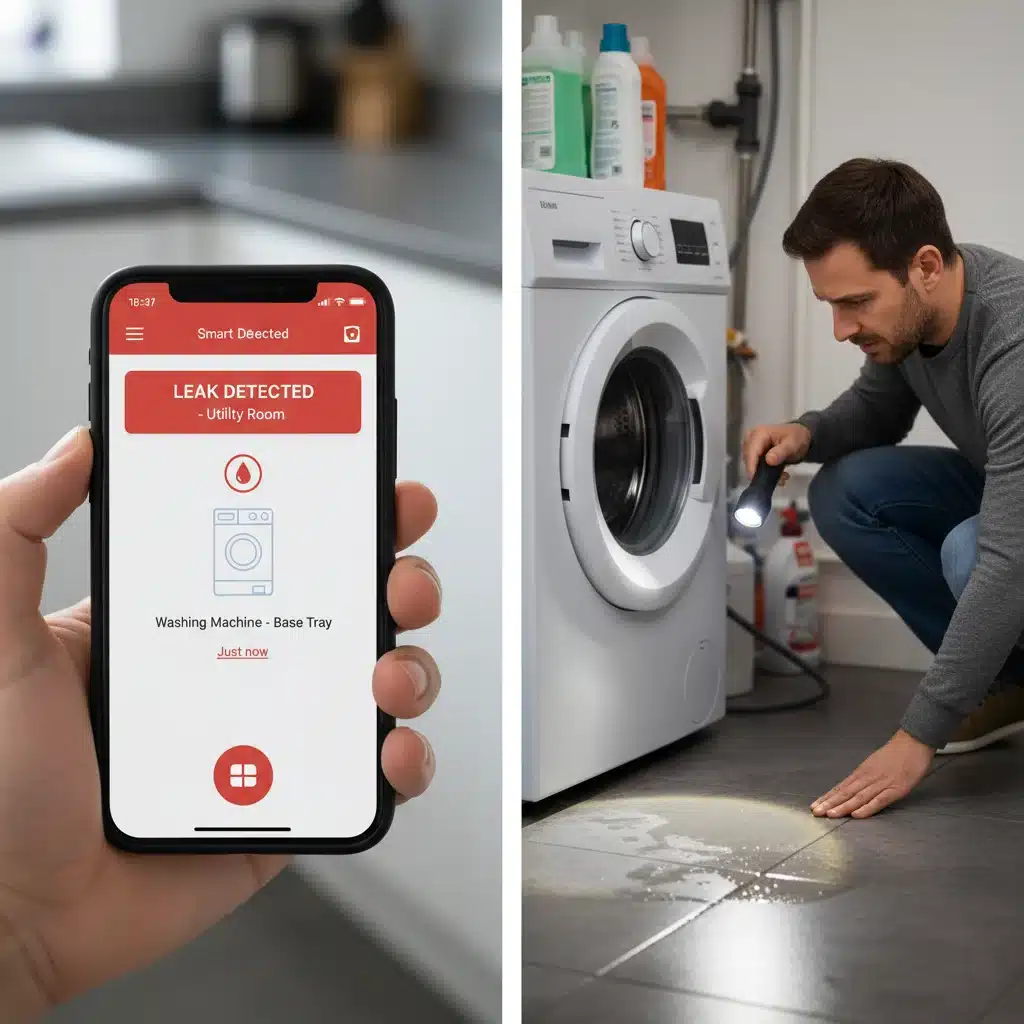
When your smart leak sensor detects water, you’ll receive a notification on your smartphone. This notification should clearly state:
- Which Sensor Triggered: Thanks to your diligent naming, you’ll know immediately if it’s the ‘Kitchen Sink Sensor’ or ‘Water Heater Sensor’.
- The Event: Typically, ‘Water Detected’ or ‘Leak Alert’.
- Time of Detection: Crucial for understanding how long the leak might have been active.
Some apps may also provide a history log of alerts, allowing you to track intermittent issues.
Immediate Actions When a Leak is Detected
- Don’t Panic, Act Swiftly: The early warning from your DIY smart leak sensors gives you a significant advantage.
- Locate the Source: Go directly to the sensor that triggered the alert. Visually inspect the area to pinpoint the exact source of the leak.
- Shut Off Water Supply: If it’s a minor leak from an appliance (like a toilet or sink), you might be able to turn off the local shut-off valve. For a major leak or if you can’t find the specific source, immediately shut off your home’s main water supply. Knowing where your main water shut-off valve is located is critical for every homeowner.
- Contain and Clean Up: Once the water supply is off or the leak is stopped, begin containing the water with towels or buckets. If the area is accessible, use a wet/dry vacuum for larger spills.
- Assess Damage: Evaluate the extent of the water damage. Take photos for insurance purposes.
- Contact Professionals: Depending on the severity and cause, you may need to call a plumber for repairs or a water damage restoration company for cleanup and drying.
Preventing Future Occurrences
After addressing a leak, take steps to prevent it from happening again:
- Repair or Replace: Fix the faulty plumbing or appliance.
- Regular Inspections: Periodically check hoses, pipes, and seals on appliances.
- Upgrade Components: Consider replacing old rubber hoses with braided stainless steel lines for washing machines and dishwashers.
By understanding how to respond to alerts from your DIY smart leak sensors, you turn a potential disaster into a manageable incident, saving significant time, money, and stress.
The Long-Term Benefits of Investing in DIY Smart Leak Sensors
While the immediate goal of installing DIY smart leak sensors is rapid leak detection, the long-term benefits extend far beyond just preventing a single incident. Integrating these smart devices into your home contributes to a safer, more efficient, and ultimately more valuable property.
Financial Savings and Insurance Benefits
- Reduced Repair Costs: Early detection means smaller leaks are caught before they become major floods, drastically cutting down on repair expenses for drywall, flooring, and structural components.
- Lower Insurance Premiums: Many insurance companies offer discounts to homeowners who install smart home security and water leak detection systems. Be sure to check with your provider after installation.
- Avoidance of Deductibles: Preventing a claim altogether means you won’t have to pay your insurance deductible, which can often be hundreds or thousands of dollars.
Enhanced Peace of Mind and Property Value
- Constant Monitoring: Whether you’re at work, on vacation, or asleep, your DIY smart leak sensors are vigilant guardians, offering continuous protection. This peace of mind is invaluable.
- Healthier Home Environment: Unaddressed leaks can lead to mold and mildew growth, impacting indoor air quality and posing health risks. Early detection helps prevent these issues.
- Increased Property Value: A smart home equipped with modern safety features like leak detection can be more attractive to potential buyers, potentially increasing your home’s market value.
Environmental Responsibility
Beyond personal benefits, using DIY smart leak sensors also contributes to environmental conservation by:
- Reducing Water Waste: Even a slow drip can waste thousands of gallons of water over time. Catching these leaks early helps conserve this precious resource.
- Preventing Material Waste: Avoiding extensive water damage means fewer materials (drywall, wood, insulation) need to be replaced and sent to landfills.
The initial investment in DIY smart leak sensors is minimal compared to the potential costs of water damage. It’s a proactive step towards a smarter, safer, and more sustainable home. By following this guide, you’ve not only protected your property in under 30 minutes but also taken a significant stride towards a more intelligent and secure living space.
Conclusion: Empowering Your Home with DIY Smart Leak Sensors
In a world where unforeseen household emergencies can strike at any moment, equipping your home with DIY smart leak sensors is a proactive and highly effective measure. We’ve demonstrated that protecting your home from the devastating effects of water damage doesn’t require professional installation or a hefty budget. With just a few affordable devices, a smartphone, and less than 30 minutes of your time, you can establish a robust early warning system.
By strategically placing four smart leak detectors in vulnerable areas such as under sinks, near water heaters, and behind laundry appliances, you create a network of vigilant guardians. These small but powerful devices offer unparalleled peace of mind, sending instant alerts to your phone the moment water is detected, allowing you to intervene before minor drips escalate into catastrophic floods.
The journey doesn’t end with installation. Regular testing, battery checks, and exploring smart home integrations like automated water shut-off valves can further enhance your home’s resilience. Embracing DIY smart leak sensors is more than just installing gadgets; it’s about investing in the long-term safety, value, and sustainability of your most cherished asset – your home. Take control, stay informed, and enjoy the profound sense of security that comes with a truly smart and protected living space.