Smart Home DIY: Install Your First Smart Plug Network in Under 1 Hour
Smart Home DIY for Beginners: Install Your First Smart Plug Network in Under 1 Hour for 2026
Welcome to the future of home living! If you’ve ever dreamed of a home that anticipates your needs, responds to your voice, or simply saves you energy without you lifting a finger, then you’re in the right place. The world of smart home technology can seem daunting at first, with countless gadgets and complex systems. But what if we told you that you could kickstart your smart home journey, even as a complete beginner, by installing your first Smart Plug Network in under an hour? Yes, you read that right!
In this comprehensive guide, we’ll demystify smart plugs and walk you through every step of setting up a robust Smart Plug Network. By 2026, smart homes are no longer a luxury but an increasingly accessible and beneficial addition to modern living. Let’s dive in and transform your ordinary appliances into intelligent devices, bringing convenience, efficiency, and peace of mind to your household.
What Exactly is a Smart Plug Network and Why Do You Need One?
Before we get our hands dirty with installation, let’s understand the core of what we’re building: a Smart Plug Network. At its simplest, a smart plug is an adapter that fits between your electrical outlet and an appliance. What makes it “smart” is its ability to connect to your home’s Wi-Fi network, allowing you to control the power supply to the connected appliance remotely via a smartphone app, voice commands, or automated schedules.
A Smart Plug Network is essentially a collection of these smart plugs, all working together and managed from a central point (usually an app on your phone or a smart home hub). This network allows you to:
- Control Appliances Remotely: Forgot to turn off the iron? Want to switch on the lights before you get home? A smart plug network gives you control from anywhere.
- Automate Your Home: Set schedules for lights, coffee makers, or fans. Imagine your lights turning on gradually in the morning or your space heater warming up just before you wake.
- Save Energy: Monitor energy consumption of connected devices and easily switch off “vampire” electronics that draw power even when not in use.
- Enhance Security: Use smart plugs to turn lights on and off randomly when you’re away, creating the illusion of occupancy.
- Integrate with Voice Assistants: Pair your smart plugs with Amazon Alexa, Google Assistant, or Apple HomeKit for hands-free control.
The beauty of a Smart Plug Network is its modularity and affordability. You don’t need to overhaul your entire home; you can start small and expand as your needs and budget allow. It’s the perfect entry point for anyone looking to dip their toes into the smart home ecosystem without a significant investment or complex setup.
Choosing the Right Smart Plugs for Your Network: A 2026 Perspective
The market for smart plugs has exploded, with numerous brands and features available. For your first Smart Plug Network, simplicity and compatibility are key. Here’s what to consider:
1. Wi-Fi vs. Hub-Based Plugs
- Wi-Fi Smart Plugs: These are the easiest to set up for beginners. They connect directly to your home’s Wi-Fi network, requiring no additional hub. Brands like TP-Link Kasa, Amazon Smart Plug, and Gosund are popular choices.
- Hub-Based Plugs (e.g., Zigbee, Z-Wave): These require a separate smart home hub (like Samsung SmartThings, Hubitat, or Philips Hue Bridge) to function. While they offer more advanced features, better range, and often consume less power, they add an extra layer of complexity and cost, making them less ideal for a first-time setup. For this guide, we’ll focus on Wi-Fi smart plugs for their ease of use.
2. Compatibility with Voice Assistants
If you already use Amazon Alexa, Google Assistant, or Apple HomeKit, ensure your chosen smart plugs are compatible. Most modern Wi-Fi smart plugs support at least Alexa and Google Assistant, with some offering HomeKit integration.
3. Features to Look For
- Energy Monitoring: Some smart plugs can track the energy consumption of connected devices, helping you identify energy hogs and save on electricity bills.
- Scheduling and Timers: Essential for automation, allowing you to set specific times for devices to turn on or off.
- Away Mode: Simulates occupancy by randomly turning lights on and off.
- Compact Design: Ensure the plug doesn’t block adjacent outlets.
- Indoor/Outdoor Use: If you plan to automate outdoor lights or decorations, look for weather-resistant outdoor smart plugs.
4. Price and Brand Reputation
While price is always a factor, don’t compromise too much on quality. Stick to reputable brands known for reliability and good app support. TP-Link Kasa, Amazon, and Wyze are excellent starting points for a beginner-friendly Smart Plug Network.
For this guide, we recommend starting with a pack of 2-4 Wi-Fi smart plugs from a single brand to ensure a consistent experience and easier management within one app. For instance, a 4-pack of Kasa Smart Plugs is often a great value and provides a solid foundation for your first Smart Plug Network.
Pre-Installation Checklist: Get Ready to Build Your Smart Plug Network
Before you unbox your shiny new smart plugs, a little preparation goes a long way in ensuring a smooth and quick installation. Remember, our goal is to get your Smart Plug Network up and running in under an hour!
1. Stable Wi-Fi Connection
This is paramount. Smart plugs rely heavily on your home’s Wi-Fi network. Ensure you have a stable 2.4GHz Wi-Fi network available. Most smart plugs do not support 5GHz Wi-Fi. If you have a dual-band router, make sure your phone is connected to the 2.4GHz band during the initial setup process.
2. Smartphone and App
You’ll need a smartphone (iOS or Android) to download the smart plug’s companion app. Download it beforehand and create an account if prompted. Having the app ready saves valuable time.
3. Identify Your Target Appliances
Think about what you want to automate first. Great starter appliances for your Smart Plug Network include:
- Lamps (table lamps, floor lamps)
- Coffee makers
- Fans
- Humidifiers/Dehumidifiers
- Christmas lights or other decorative lighting
- Hair straighteners/curling irons (for safety auto-off)
Avoid high-power appliances like refrigerators, washing machines, or electric heaters, as these can exceed the smart plug’s maximum wattage and pose a safety risk. Always check the smart plug’s specifications for maximum load.
4. Clear the Area
Ensure the outlets you plan to use are easily accessible. You’ll need space to plug in the smart plug and then the appliance.
5. Your Wi-Fi Password
Keep your Wi-Fi password handy. You’ll need it to connect your smart plugs to your home network.
Once you’ve checked off these items, you’re fully prepared to embark on your smart home DIY adventure and create your first efficient Smart Plug Network!
Step-by-Step Installation: Building Your Smart Plug Network in Under an Hour
Here’s where the magic happens! Follow these simple steps to install your Smart Plug Network quickly and efficiently. We’ll use a generic Wi-Fi smart plug setup, but specifics might vary slightly by brand.
Step 1: Download the App and Create an Account (5-10 minutes)
If you haven’t already, download the specific app for your smart plugs (e.g., Kasa Smart, Amazon Alexa app, Wyze app). Open the app and follow the on-screen instructions to create a new user account. This usually involves providing an email address and creating a password. Some apps might require email verification.
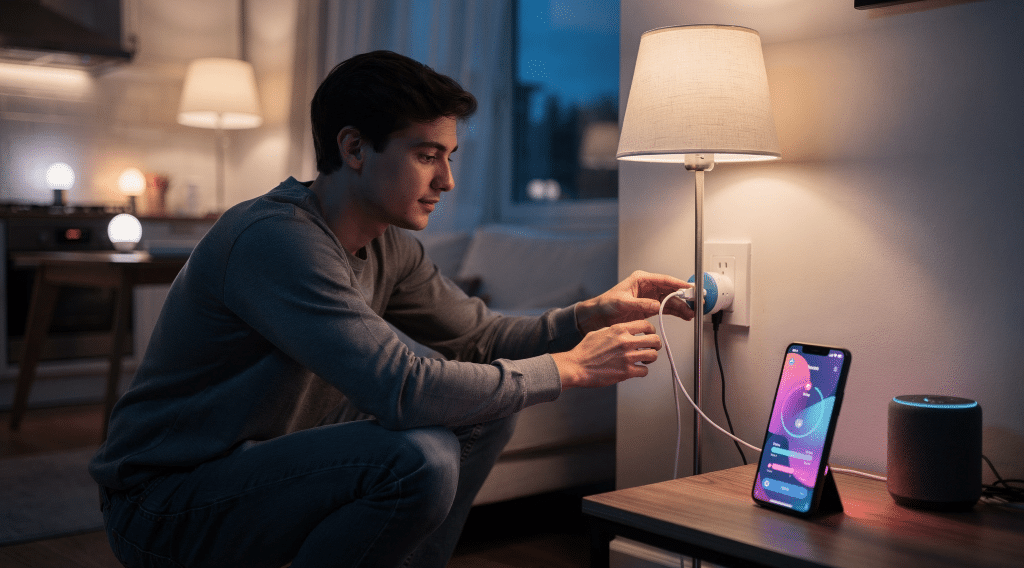
Step 2: Plug in Your First Smart Plug (2 minutes per plug)
Take one of your smart plugs and plug it into an electrical outlet that you’ve chosen for your first automated appliance. Do not plug the appliance into the smart plug yet. The smart plug will usually have an LED indicator light that starts blinking, signaling it’s in pairing mode.
Step 3: Add the Smart Plug to the App (5-10 minutes per plug)
- Open the App: Make sure your smartphone is connected to your 2.4GHz Wi-Fi network.
- Initiate Device Addition: In the app, look for an “Add Device,” “+” icon, or similar option to add a new smart device.
- Select Smart Plug: Choose “Smart Plug” or “Outlet” from the list of device types.
- Follow On-Screen Prompts: The app will guide you through the process, which typically involves:
- Confirming the smart plug’s LED is blinking.
- Connecting your phone temporarily to the smart plug’s own Wi-Fi signal (this is a temporary network the plug creates for setup).
- Selecting your home’s 2.4GHz Wi-Fi network from a list and entering your Wi-Fi password.
- Waiting for the smart plug to connect to your home network. The LED light will usually turn solid green or blue once connected.
- Name Your Plug: Once connected, the app will prompt you to give your smart plug a descriptive name (e.g., “Living Room Lamp,” “Coffee Maker,” “Bedroom Fan”). This is crucial for easy identification and voice control.
Step 4: Plug in Your Appliance and Test (1 minute per plug)
Now, plug your chosen appliance into the smart plug. Use the app to turn the smart plug on and off. You should see the appliance respond accordingly. Congratulations, you’ve successfully added your first device to your Smart Plug Network!
Step 5: Repeat for Additional Smart Plugs (10-15 minutes for 3-4 plugs)
Repeat Steps 2-4 for each additional smart plug you want to add to your network. The process becomes faster once you’re familiar with it. Most apps make it easy to add multiple devices sequentially.
Step 6: Organize Your Network and Set Up Basic Automation (10-15 minutes)
With all your plugs connected, it’s time to organize and automate:
- Group Devices: Many apps allow you to group smart plugs (e.g., “All Living Room Lights”). This enables you to control multiple devices with a single command.
- Set Schedules: Go to the “Schedules” or “Timers” section in the app. Set your living room lamp to turn on at sunset and off at 11 PM. Schedule your coffee maker to brew at 7 AM.
- Explore Scenes/Routines: Create “scenes” or “routines” for common scenarios. A “Movie Night” scene could dim the lights and turn on the TV (if connected to a smart plug). An “Away” scene could turn off all lights and activate random lighting patterns.
And just like that, you’ve built your foundational Smart Plug Network! All this can comfortably be done well within the one-hour mark, especially if you’ve prepared adequately.
Integrating Your Smart Plug Network with Voice Assistants
For many, the ultimate convenience of a smart home comes from voice control. Integrating your Smart Plug Network with Amazon Alexa, Google Assistant, or Apple HomeKit is usually a straightforward process.
For Amazon Alexa or Google Assistant:
- Open the Voice Assistant App: Launch the Alexa app or Google Home app on your smartphone.
- Add Skill/Service:
- Alexa: Go to “More” > “Skills & Games.” Search for the brand of your smart plugs (e.g., “Kasa,” “Wyze”). Enable the skill and link your smart plug account using the credentials you created earlier.
- Google Assistant: Go to “Settings” > “Works with Google.” Search for your smart plug brand, select it, and link your account.
- Discover Devices: Once linked, the voice assistant app will discover all the smart plugs you’ve set up. You might need to tap a “Discover Devices” button.
- Assign to Rooms: Assign your newly discovered smart plugs to specific rooms within the voice assistant app for better organization and control (e.g., “Alexa, turn on the living room lamp”).
For Apple HomeKit:
Some smart plugs are “HomeKit-enabled” and have a HomeKit code (a QR code or numerical code). If your plugs support HomeKit:
- Open the Home App: Launch the Apple Home app on your iOS device.
- Add Accessory: Tap the “+” icon > “Add Accessory.”
- Scan Code: Use your phone’s camera to scan the HomeKit code on the smart plug or its packaging.
- Follow Prompts: Assign the plug to a room and give it a name.
Now you can control your Smart Plug Network with simple voice commands, adding another layer of convenience to your smart home experience.
Maximizing Your Smart Plug Network: Advanced Tips for 2026
Once you’ve mastered the basics, here are some ways to get even more out of your Smart Plug Network:
1. Energy Monitoring for Savings
If your smart plugs support energy monitoring, regularly check the app to see which devices are consuming the most power. You might be surprised by “vampire” electronics that draw power even when off. Use schedules to completely cut power to these devices when not in use.
2. Vacation Mode for Security
Many smart plugs offer an “Away Mode” or “Vacation Mode” that randomly turns lights on and off to simulate occupancy. This is an excellent, low-cost security measure when you’re away from home.
3. Conditional Automation (If-Then Scenarios)
As your Smart Plug Network grows, you might want to explore more sophisticated automation. Many smart plug apps, and certainly voice assistant apps (like Alexa Routines or Google Home Automations), allow for “if this, then that” scenarios. For example:
- IF motion is detected by a smart sensor, THEN turn on the hallway light (connected to a smart plug).
- IF the temperature drops below a certain point, THEN turn on the space heater (connected to a smart plug, ensuring it’s within wattage limits).
This requires additional smart sensors, but it shows the potential for expanding your smart home capabilities beyond simple scheduling.
4. Creating “Scenes” or “Routines”
Combine multiple smart plugs and other smart devices into single commands. A “Good Morning” routine could turn on your bedroom lamp, start the coffee maker, and play the news on a smart speaker. A “Good Night” routine could turn off all lights, switch off the TV, and arm your security system.
5. Troubleshooting Common Issues
Even the most robust Smart Plug Network can encounter hiccups. Here are quick fixes for common issues:
- Plug Not Connecting: Ensure your phone is on the 2.4GHz Wi-Fi band during setup. Try unplugging the smart plug and plugging it back in to restart its pairing mode.
- Device Offline: Check your Wi-Fi signal strength at the plug’s location. If it’s weak, consider a Wi-Fi extender. Restarting your router can often resolve connectivity issues.
- Voice Control Not Working: Double-check that the smart plug skill/service is enabled in your voice assistant app and that the plug is named clearly. Try re-discovering devices.
Remember, a little patience and a quick search of the smart plug brand’s support page can usually solve most problems.
The Future of Your Smart Plug Network: Expansion and Evolution in 2026
By 2026, the smart home landscape continues to evolve rapidly. Your initial Smart Plug Network is just the beginning. As you become more comfortable, you might consider:
1. Expanding Your Network
Add more smart plugs to other rooms or for more appliances. You’ll quickly find new ways to automate your daily routines and enhance convenience.
2. Integrating Other Smart Devices
Smart plugs are fantastic for “dumb” appliances, but a true smart home integrates various devices. Consider smart light bulbs, smart thermostats, smart locks, or security cameras. Many smart plug apps and voice assistant platforms allow seamless integration of these different device types, creating a more cohesive and powerful smart home ecosystem.
3. Exploring Advanced Automation Platforms
If you crave more complex automation and interoperability between different brands, platforms like Home Assistant, OpenHAB, or IFTTT (If This Then That) can take your smart home to the next level. These platforms offer unparalleled customization and control, allowing you to create highly personalized automations.
4. Considering a Smart Home Hub
While we started with Wi-Fi plugs to avoid a hub, as your network grows, a dedicated smart home hub (like Samsung SmartThings or Hubitat) can offer benefits. Hubs often provide more reliable local control (meaning devices still work even if your internet goes down), better range for devices like Zigbee or Z-Wave, and centralized management for a diverse range of smart devices. However, this is a step for when you’re ready for more advanced configuration.
Conclusion: Your Smart Home Journey Starts Now!
Congratulations! You’ve now learned how to install your first Smart Plug Network in under an hour, transforming your home into a smarter, more efficient, and more convenient living space for 2026 and beyond. This DIY project is not only easy but also incredibly rewarding, opening the door to the vast possibilities of home automation.
Remember, the goal is to enhance your life, not complicate it. Start small, experiment with different automations, and enjoy the newfound control and comfort your smart plugs bring. Whether it’s saving energy, boosting security, or simply having your coffee ready when you wake up, your Smart Plug Network is a powerful tool at your fingertips.
So, what are you waiting for? Grab those smart plugs, download the app, and embark on your exciting smart home journey today!


